-
 Jeetendra Singh
 - 22 Dec, 2015
Steps to create dynamic multilevel menu using php and mysql
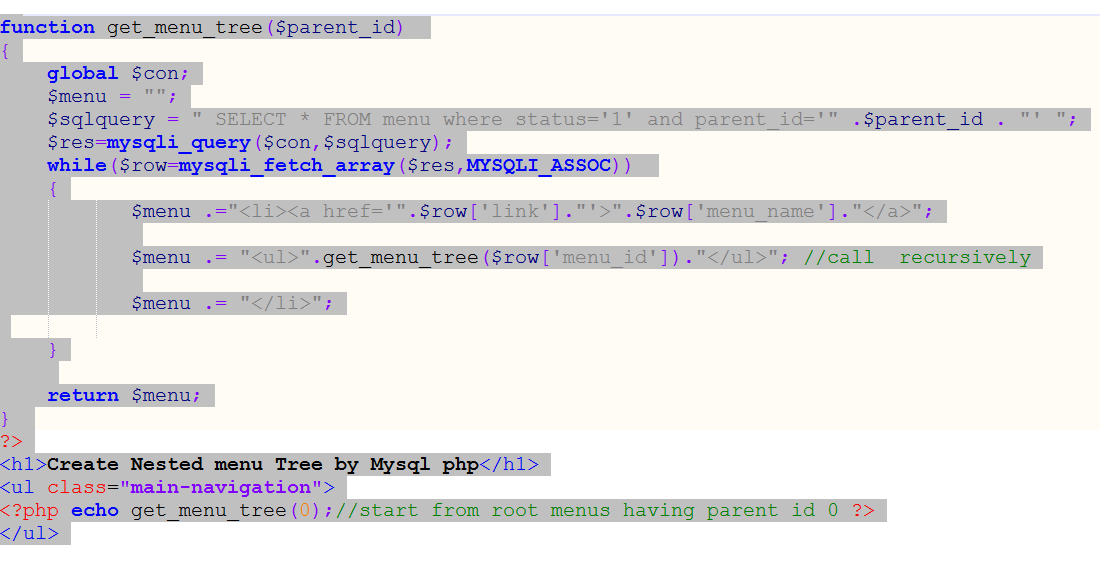
Hi Geeks, Today i am sharing you ” Steps to create dynamic multilevel menu using php and mysql” which can be called “example of recusion in php & mysql”. What Exactly recursion is ? Recursion is a technique or Algorithm by which we can go and return the collection of sequenced data with n depth. It is a condition based child search and return the output to the previous stepped varriable’s scope. we can solve many of the programming problems using recursion. In following Example we will sort out a problem where we need to show nested n number of depth relation saved in mysql menu table with having proper opening and closng the and tags in html. Following are the steps : Step 1. Create a mysql Table in your database by executing following sql statement -- -- Table structure for table menu CREATE TABLE IF NOT EXISTS menu ( menu_id int(11) NOT NULL AUTO_INCREMENT, menu_name varchar(255) NOT NULL, parent_id int(11) NOT NULL DEFAULT '0' COMMENT '0 if menu is root level or menuid if this is child on any menu', link varchar(255) NOT NULL, status enum('0','1') NOT NULL DEFAULT '1' COMMENT '0 for disabled menu or 1 for enabled menu', PRIMARY KEY (menu_id) ) ENGINE=InnoDB DEFAULT CHARSET=latin1 AUTO_INCREMENT=37 ; -- -- Dumping data for table menu INSERT INTO menu (menu_id, menu_name, parent_id, link, status) VALUES (1, 'Home', 0, '#home', '1'), (2, 'Web development', 0, '#web-dev', '1'), (3, 'WordPress Development', 0, '#wp-dev', '1'), (4, 'About w3school.info', 0, '#w3school-info', '1'), (5, 'AWS ADMIN', 2, '#', '1'), (6, 'PHP', 2, '#', '1'), (7, 'Javascript', 2, '#', '1'), (8, 'Elastic Ip', 5, '#electic-ip', '1'), (9, 'Load balacing', 5, '#load-balancing', '1'), (10, 'Cluster Indexes', 5, '#cluster-indexes', '1'), (11, 'Rds Db setup', 5, '#rds-db', '1'), (12, 'Framework Development', 6, '#', '1'), (13, 'Ecommerce Development', 6, '#', '1'), (14, 'Cms Development', 6, '#', '1'), (21, 'News & Media', 6, '#', '1'), (22, 'Codeigniter', 12, '#codeigniter', '1'), (23, 'Cake', 12, '#cake-dev', '1'), (24, 'Opencart', 13, '#opencart', '1'), (25, 'Magento', 13, '#magento', '1'), (26, 'Wordpress', 14, '#wordpress-dev', '1'), (27, 'Joomla', 14, '#joomla-dev', '1'), (28, 'Drupal', 14, '#drupal-dev', '1'), (29, 'Ajax', 7, '#ajax-dev', '1'), (30, 'Jquery', 7, '#jquery-dev', '1'), (31, 'Themes', 3, '#theme-dev', '1'), (32, 'Plugins', 3, '#plugin-dev', '1'), (33, 'Custom Post Types', 3, '#', '1'), (34, 'Options', 3, '#wp-options', '1'), (35, 'Testimonials', 33, '#testimonial-dev', '1'), (36, 'Portfolios', 33, '#portfolio-dev', '1'); Step 2. Connect with databaseStep 3. Implement the recursion logic ".$row['menu_name'].""; $menu .= "".get_menu_tree($row['menu_id']).""; //call recursively $menu .= ""; } return $menu; } ?>Step 4: Ininitialize start the Recursion in Parent Content HolderStep 5: Close the Mysql connectionStep 6. depth css implementation in style tag in head sectionul { list-style: none; padding: 0; margin: 0; background: #1bc2a2; }ul li { display: block; position: relative; float: left; background: #1bc2a2; }/* This hides the dropdowns */li ul { display: none; }ul li a { display: block; padding: 1em; text-decoration: none; white-space: nowrap; color: #fff; }ul li a:hover { background: #2c3e50; }/* Display the dropdown */li:hover > ul { display: block; position: absolute; }li:hover li { float: none; }li:hover a { background: #1bc2a2; }li:hover li a:hover { background: #2c3e50; }.main-navigation li ul li { border-top: 0; }/* Displays second level dropdowns to the right of the first level dropdown */ul ul ul { left: 100%; top: 0; }/* Simple clearfix */ul:before, ul:after { content: " "; /* 1 */ display: table; /* 2 */ }ul:after { clear: both; }Conclusion : Complete Code in one File.create dynamic multilevel menu using php and mysqlul { list-style: none; padding: 0; margin: 0; background: #1bc2a2; }ul li { display: block; position: relative; float: left; background: #1bc2a2; } /* This hides the dropdowns */ li ul { display: none; } ul li a { display: block; padding: 1em; text-decoration: none; white-space: nowrap; color: #fff; } ul li a:hover { background: #2c3e50; } /* Display the dropdown */ li:hover > ul { display: block; position: absolute; } li:hover li { float: none; } li:hover a { background: #1bc2a2; } li:hover li a:hover { background: #2c3e50; } .main-navigation li ul li { border-top: 0; } /* Displays second level dropdowns to the right of the first level dropdown */ ul ul ul { left: 100%; top: 0; } /* Simple clearfix */ ul:before, ul:after { content: " "; /* 1 / display: table; / 2 */ } ul:after { clear: both; }// Perform queries function get_menu_tree($parent_id) { global $con; $menu = ""; $sqlquery = " SELECT * FROM menu where status='1' and parent_id='" .$parent_id . "' "; $res=mysqli_query($con,$sqlquery); while($row=mysqli_fetch_array($res,MYSQLI_ASSOC)) { $menu .="<a href='".$row['link']."'>".$row['menu_name'].""; $menu .= "".get_menu_tree($row['menu_id']).""; //call recursively $menu .= ""; }return $menu;} ?> Create Nested menu Tree by Mysql php
- Jeetendra Singh
- 11 Dec, 2015
Implement caching in php website
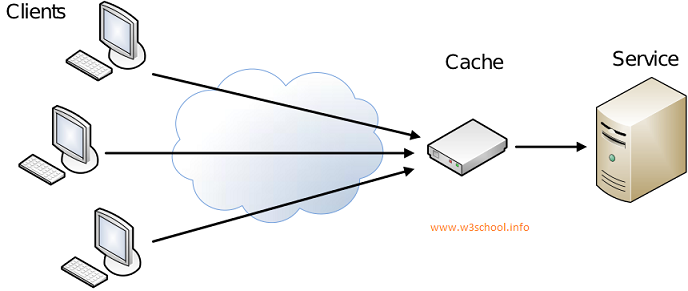
Hi Experts, Today i am sharing you Step by Step instructions for Implement caching in php website. First of all we have to understand that what is cache exactly and how cache exactly works . What is cache ? Cache is a technique to optimize web page speed,load time and execution . it just reduces database calls and load by delivering contend by cached pages or objects which we saved in file-system or objects .We can Achieve cache with multiple logic like File Storage Cache(Most popular & this article is about itself),Object Stored cache( like Memcache),Application level cache (like Varnish Cache) ,SQL Query Cache. Simply Cache is not a logic or program it is just a concept and that can be achieve with multiple logic or programs/techniques as above. Now See that How Cache works with Server and Client See in Following Figure.Now Step by Step Implement caching in php website Step 1 : Create a Cache class with file name cache.class.php in your website root directory cache_ext=$cache_ext; $this->cache_time=$cache_time; $this->cache_folder=$cache_folder; $this->ignore_pages=$ignore_pages; $this->dynamic_url = "http://".$_SERVER['HTTP_HOST']. $_SERVER['REQUEST_URI'] . $_SERVER['QUERY_STRING']; $this->_cache_file = $this->cache_folder. md5($this->dynamic_url).$this->cache_ext; $this->_ignore_status = (in_array($this->dynamic_url,$this->ignore_pages))?true:false; if($cache_enable==1) { if (!$this->_ignore_status && file_exists($this->_cache_file) && time() - $this->cache_time _cache_file)) { //check Cache exist and it's not expired. ob_start('ob_gzhandler'); //Turn on output buffering, "ob_gzhandler" for the compressed page with gzip. readfile($this->_cache_file); //read Cache file echo '_cache_file)).', Page : '.$this->dynamic_url.' -->'; ob_end_flush(); //Flush and turn off output buffering exit(); //no need to proceed further, exit the flow. } } //Turn on output buffering with gzip compression. ob_start('ob_gzhandler'); }}?>Step 2 : Put Following code Before your website header file/template file or any file where you want to achieve cache. Note : this code should be always upper from your tag starts.Step 3 : In the Footer template or page just After the close tag. cache_folder)) { //create a new folder if we need to mkdir($cache_obj->cache_folder); } if(!$cache_obj->_ignore_status){ $fp = fopen($cache_obj->_cache_file, 'w'); //open file for writing fwrite($fp, ob_get_contents()); //write contents of the output buffer in Cache file fclose($fp); //Close file pointer } ob_end_flush(); //Flush and turn off output buffering?>Step 4 : Check you page and see that for the time you set in code or by default 1 hour you webpage will give same output for all users very quickly. Question : how to verify that cache is implemented or not Answer : load your webpage where you implement this cache system after it CTRL+U or see page source. in that in last of your code there will be a html comment having following text ” cached page by cache class by w3school ” Now Enjoy the Script by https://www.w3school.info/
- Jeetendra Singh
- 09 Dec, 2015
complete login system in codeigniter php
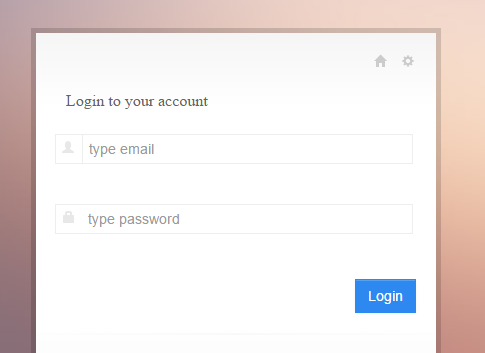
Hi Geeks, I am showing you “complete login system in codeigniter php”. In this example i’ll show you a simple login example with srored procedure in codeigniter framework. Step 1. Install Codeigniter and configure database.php in application/config folder Step2. create a table in your databse by following sql statement --create table staement-- CREATE TABLE IF NOT EXISTS webadmin ( id int(11) NOT NULL AUTO_INCREMENT, name varchar(255) NOT NULL, email varchar(255) NOT NULL, password varchar(255) NOT NULL, website varchar(255) NOT NULL, is_active int(11) NOT NULL DEFAULT '0', is_delete int(11) NOT NULL DEFAULT '0', added_date datetime NOT NULL, modified_date timestamp NOT NULL DEFAULT '0000-00-00 00:00:00' ON UPDATE CURRENT_TIMESTAMP, address varchar(255) NOT NULL, admin_ip varchar(255) NOT NULL, PRIMARY KEY (id) ) ENGINE=InnoDB DEFAULT CHARSET=latin1 AUTO_INCREMENT=17 ; -- -- Dumping data for table webadmin INSERT INTO webadmin (id, name, email, password, website, is_active, is_delete, added_date, modified_date, address, admin_ip) VALUES (1, 'Jeetendra', '[email protected]', 'e10adc3949ba59abbe56e057f20f883e', 'https://www.w3school.info', 1, 0, '2015-11-18 08:24:49', '2015-11-18 11:58:01', 'JAIPUR', '192.256.1.1'); Note : By default in sql dump we have following login details set Login Credentials: email : [email protected] password:123456 //in sql dump file password saved in md5 encryted. Step 3.Now Create a Procedure named LOGIN_AUTH by executing following sql statement in phpmyadmin by select your db and in sql execute area. CREATE PROCEDURE LOGIN_AUTH(IN _email VARCHAR(255) CHARSET utf8, IN _password VARCHAR(255) CHARSET utf8) NOT DETERMINISTIC NO SQL SQL SECURITY DEFINER SELECT * FROM webadmin WHERE (is_active='1' and is_delete='0') and ( email= _email and password = _password ) In this satement we have created a stored procedure which accepts 2 parameters varchar email and password, and in procedure body there is a select match sql statement that verify that user is having details or exists with these details. Step 4. Create a Model named “Common_model.php” in your model folder by putting following code. db->reconnect(); $sql = "CALL `".$proc_name."`"; $indexes=array(); foreach($data as $c) { $indexes[]="?"; } if(count($indexes)>0) $sql.= "(".implode(",",$indexes).")"; else $sql.= "()"; $result = $this->db->query($sql,$data); if($only_exec==0) $ret = $result->result_array(); else $ret = $result; $this->db->close(); } catch (Exception $e) { echo $e->getMessage(); } return $ret; }} ?>Note : Make home controller as default controller in application/config/routes.php $route['default_controller'] = 'home'; Step 5. Now create a Controller named “Home.php” controller in you Controller folder with following code. load->database(); $this->load->helper('url'); $this->load->model('Common_model'); } public function index() { $this->check_alreadylogin();//send to dashboard if session data is exist or user is already logged in or logged information is saved in session. $this->load->library('form_validation'); $config = array( array( 'field' => 'user_username', 'label' => 'Email', 'rules' => 'trim|required|valid_email' ), array( 'field' => 'user_password', 'label' => 'Password', 'rules' => 'trim|required' ) ); $this->form_validation->set_rules($config); if($this->form_validation->run() == FALSE) { $this->data['page_title']="Login Controller"; $this->load->view('login'); }else{ $username = trim($this->input->post('user_username')); $password = md5(trim($this->input->post('user_password'))); $data[0]=$username; $data[1]=$password; $this->_authenticate($data); } } public function _authenticate($data) { $retRes=$this->Common_model->exec_proc("LOGIN_AUTH",$data); if(!empty($retRes)){ $this->session->set_userdata('webadmin_session',$retRes[0]); $this->webadmin_session = $this->session->userdata('webadmin_session'); redirect('/dashboard'); }else{ $this->session->set_flashdata('fail_msg','You don\'t have permission to access this Admin panel.'); redirect('/'); } } public function checklogin() { $is_login=$this->session->userdata('webadmin_session'); if(!isset($is_login['id']) || $is_login['id'] == 0 || $is_login['id'] == "" ) { $this->session->unset_userdata('webadmin_session'); redirect('/'); } } public function check_alreadylogin() { $already_login=$this->session->userdata('webadmin_session'); if(isset($already_login['id']) && $already_login['id'] > 0) { redirect('/dashboard'); } } public function dashboard() { $this->checklogin(); //use to logged out if use is not logged in or session has been out $UserData=$this->session->userdata('webadmin_session'); //retrieve user data from session$this->data['logged_username']=$UserData['name']; //assign the user name to the view for showing welcome username $this->load->view('dashboard'); } public function logout() { $this->session->unset_userdata('webadmin_session'); redirect('/'); } }?>In this Controller index function we create a login logic and called the model’s procedure execution function where we passes 2nd parameter as a data in array form with email and password respectively indexes. Now model picks the data array and set a order and prepare a stored procedure statement to execute. First parameter is procedure name,second is a order data array required by procedure, and third parameter if we require a data to be return by model then we have to pass third parameter with value 1 . Note: third parameter is optional. by default it doesn’t return any data it just receive 0 in third parameter by default. Step 6. Now we have create a View for loading the Login form with name “login.php” Login to your account <?php if($this->session->flashdata('fail_msg')!="") { echo '<p style="colr:red;">'; echo $this->session->flashdata('fail_msg'); echo '</p>'; } ?> <fieldset> <div class="input-prepend" title="Username"> <span class="add-on"><i class="halflings-icon user"></i></span> <input class="input-large span10" name="user_username" value="<?php echo set_value('user_username'); ?>" id="user_username" type="email" placeholder="type email"/> <?php echo form_error('user_username','<p class="alert alert-error">','</p>'); ?> </div> <div class="clearfix"></div> <div class="input-prepend" title="Password"> <span class="add-on"><i class="halflings-icon lock"></i></span> <input class="input-large span10" name="user_password" value="<?php echo set_value('user_password'); ?>" id="user_password" type="password" placeholder="type password"/> <?php echo form_error('user_password','<p class="alert alert-error">','</p>'); ?> </div> <div class="clearfix"></div>Step 7. create Dashboard View in views folder named dashboard.php with following codeWelcome config->base_url(); ?>index/logout">LOGOUTNow you are logged are in and this is dashboard view You cannot directly inter in this area,want to try on unlogged session ? just copy the current url from url bar and logout out by clicking on log out link in top. Now Paste the url in browser again it will automatic redirect to login form. If you Want Seo friendly Url or Remove index.php from the codeigniter url then Read following article. /blog/how-to-remove-index-php-from-codeigniter-url/

- Jeetendra Singh
- 20 Oct, 2015
How to remove index.php from Codeigniter url
Here we will learn how to remove index.php from codeigniter url. Each of codeigniter constructed url contains the value index.php and excluding root url. No url cannot be run without index.php Assume a scenario , we have a website named www.myciportal.com Where we didn’t remove the index.php from url and i have a category with following details category name: techbuzz So by default it’s url will create like following default url : www.myciportal.com/index.php/techbuzz it will not run like this way www.myciportal.com/techbuzz For make this possible we have to work on config and htaccess both and steps are following to achieve this task If you are using mod_rewrite to remove the index.php in each url construct of codeigniter then you have to follow these steps: Step 1: In CI Project root Folder of your project create a .HTACCESS file and place following code in it RewriteEngine on RewriteBase /myprojectname RewriteRule ^(application|system|.svn) index.php/$1 [L] RewriteCond %{REQUEST_FILENAME} !-f RewriteCond %{REQUEST_FILENAME} !-d RewriteRule ^(.*)$ index.php/$1 [QSA,L] Comments :: In above code myprojectname is passed with RewriteBase , which is the demo project name of our ci project,if you are running on main domain then Redirect base will be / only , or if you are running your project in any directory then you have to specify that name. Now Step 2: in your project >> application/config/config.php Replace following line $config['index_page'] = 'index.php'; with $config['index_page'] = ''; //removed the index.php after htaccess done Now you can run your Codeigniter project and you can see the index.php has been removed from every Controller Action
- Jeetendra Singh
- 14 Oct, 2015
Start with AngularJs Program – Learn the Basics
AngularJs is a javascript library framework widely used for Single page application projects. it extends HTML dom with extra attributes which makes its more flexible to user end. It is a opensource library . For learn AngularJs you should prerequisite with html,Javascript,css, and Ajax technologies . It is similiar like JQuery (another very popular javascript library). But AngularJs Comparatively More faster and optimized to rest of the javascript libraries. More Interesting thing is that AngularJs is Promoted and Sponcered and developed by Google team. A google Engineer Started this project in 2009 , and google announced AngularJs Project in 2012. AngularJs Extends the Html Elements with ng-directives. Some Important are following: a) ng-app : Defines AngularJs Application b) ng-model : Bind the value of HTML Input Controlls(Input,Select,textarea) to Application data. c) ng-bind : binds application data to html view. For running any angularjs program we have to add following script in html section Adding a Script from google cdn.Now We are showing you a full Program to print name in a label or any place which we type in a textbox.Name: Explanation for above program: 1.AngularJs Inclusion using script tag. 2.Start ng-app in div 3.create a text input and Define its ng-model as cityname 4. bind the value of ng-model application data with p tag by defining the model name in ng-bind attribute. Now if you Run this html then it renders a Input box ,As you will type anything then the data will be shown immediately in p tag just below the textbox. for see it in action please copy and paste this program in any blank html file and run it.

- Jeetendra Singh
- 10 Oct, 2015
How to Make First PHP Program?
Hi Friends, Before writing first PHP Program, you will have to set the environment. And, for make this, you need to install the Xampp server in your system. After successful installation, we need a code editor, there are several code editors like Notepad++, Code Lobster, Netbeans etc. You can use any code editor as per your comfort for writing code. First off, go to the drive where you have installed the Xampp server. Click on Xampp and go to the htdocs folder. But don’t forget to start Xampp control panel and Apache, MySql services before writing the code. Now create a folder for your project with any name. Suppose we create a folder name myproject. Now inside this folder create a file name index.php. Below is the snippet for creating your first PHP program:Program for Print Hello W3schoolecho is a php function used for print/display on web browsers. Now Run in localhost by following address http://localhost/myproject/index.php This will print the output as follows Hello W3school Now we have done with “how to make first PHP program,” we will learn about the if – else statements, switch cases, array, data retrieval from database and many more, which are important to create a complete website.
- Jeetendra Singh
- 10 Oct, 2015
How to Install Xampp Server?
XAMPP is a free web server package developed by Apache Friends. It consists interpreters for code written in PHP programming language, and it has few other elements also which are as follows:**Apache:**It’s an application server which must be installed in machine to run a PHP program.**Mysql:**A database system for data storage in tables.**PHP:**A server side scripting language, widely used for dynamic website creation.Now follow the link to download and install Xampp server according to your operating systems whether it is Windows, Linux or Unix. Download Xampp from it’s Official Website click here After downloading the setup file you can access the url by http://localhost/ Create any program or Project you can see in this article
- Jeetendra Singh
- 08 Oct, 2015
PHP Tutorial for Beginners – An Introduction
PHP (PHP Hypertext Preprocessor) is a web development scripting language which is widely used for creating dynamic websites and portals. It Supports oops (object oriented programming standards). Top 5 frameworks which are very popular these days in web development are written in php, which are as follows:Laravel (Completely written in Symphony Objects)Symphony (Very Powerful Framework)CodeIgniterZend (acquired PHP itself)Cake PHPAll of these frameworks follow MVC (Model,View,Controller) architecture. It also has several cms also. We are providing a brief overview here: WordPress: It is basically built for blogging websites, but now you can make any informative web portals and using its woo-commerce extension, you can make e-commerce website also. Joomla: Web Portal development can be used for Ecommerce and News Portal and Great CMS. Drupal: Drupal is also most popular and advance level cms and can be used possibly for every type of web portals, including blog, magazine, newspaper, e-commerce. This can be used for any other complex cms also. Like these cms, few shopping cart solutions are also popular in this competitive market. They are listed below Magento: We can say it an e-commerce king as it is widely used for enterprise level e-commerce websites. Opencart: A very lightweight cart solution and it is ready to use for medium level e-commerce projects Prestashop: it is also very useful shopping cart solution, widely used in the United Kingdom for creating shopping websites and portals. So, my dear friends, you have experienced our first PHP TUTORIAL. We will keep you update with our further web development tutorial series also.