Showing Posts From
Php tutorials

-
 Jeetendra Singh
 - 27 Oct, 2017
Images to Video making php script using FFMPEG
Hi Geeks, This Article is based on Images to Video making php script using FFMPEG , So I am providing you the complete steps to setup the FFMPEG in windows and linux environment. FFMPEG is very good Extension for php where we can process many type of operations on audio and video like Images to video convert ,images and audio to video ,Generate Thumbnail file from video. So I have tried it on my windows system . Steps to install FFMPEG on windows or localhost: Step 1: Download the Static build for windows from following page http://ffmpeg.zeranoe.com/builds/ there will be a button for download as in the screenshot Step 2: Install prerequisite extensions Before making any php script please make available the GD2 Library from your php.ini by just uncommenting following lines(removing semicolons from start of these lines ;extension=php_gd.dll ;extension=php_gd2.dll Step 3: Extract the downloaded zip and Inside Bin folder you will find ffmpeg.exe Copy that file in your project folder in htdocs Eg: slideshow_project Now we have all images which we need to convert into video are in any folder of this projects like Images: there should be pattern of images name like pic1.jpg,pic2.jpg as so on… Step 4: write and execute a command for images to video conversion, following is the command $command1="ffmpeg -f image2 -r 1/1 -i images/pic%d.jpg -vf fps=25 test1.mp4"; //command for every 1 second image change in video exec($command1); above command is useful with creating a slideshow video where 2 second images will change and if you want to increase slide change duration for 3 second then you need to replace 1/1 to 1/3 from above command. Now if you want to mix audio along with images then following command will work $command2="ffmpeg -f image2 -r 1/5 -i images/pic%d.jpg -i audio/my_recording.mp3 -vf fps=25 test2.mp4"; //command for every 5 second image change in video along with my_recording.mp3 playing in background exec($command2); Assuming you have my_recording.mp3 in audio folder of project Installing FFMPEG in linux servers by following command sudo apt-get install ffmpeg In that case you don’t need to follow Step 1 and Step 3 If you are having any problem then please put your comments below , I would love to help you
- Jeetendra Singh
- 16 Apr, 2017
Implement Stripe in 3 steps using php
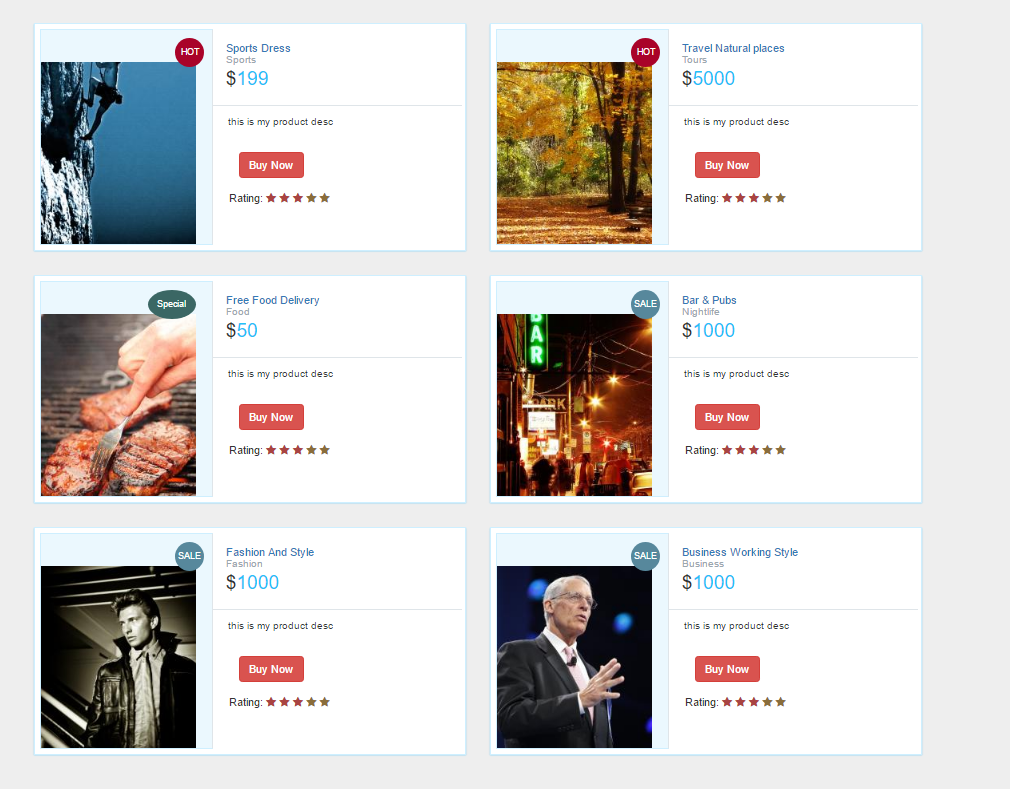
Hi Geeks, This Article is focused on Implement Stripe in 3 steps using php, where you can easily accept payments through stripe by using this code. the stripe checkout.js is used here with server side code also. Step 1: Create a product list page named index.php with following code: Digital cart demo with Stripe checkoutbody{ margin-top:20px; background:#eee; }.prod-info-main { border: 1px solid #CEEFFF; margin-bottom: 20px; margin-top: 10px; background: #fff; padding: 6px; -webkit-box-shadow: 0 1px 4px 0 rgba(21,180,255,0.5); box-shadow: 0 1px 1px 0 rgba(21,180,255,0.5); } .prod-info-main .product-image { background-color: #EBF8FE; display: block; min-height: 238px; overflow: hidden; position: relative; border: 1px solid #CEEFFF; padding-top: 40px; } .prod-info-main .product-deatil { border-bottom: 1px solid #dfe5e9; padding-bottom: 17px; padding-left: 16px; padding-top: 16px; position: relative; background: #fff } .product-content .product-deatil h5 a { color: #2f383d; font-size: 15px; line-height: 19px; text-decoration: none; padding-left: 0; margin-left: 0 } .prod-info-main .product-deatil h5 a span { color: #9aa7af; display: block; font-size: 13px } .prod-info-main .product-deatil span.tag1 { border-radius: 50%; color: #fff; font-size: 15px; height: 50px; padding: 13px 0; position: absolute; right: 10px; text-align: center; top: 10px; width: 50px } .prod-info-main .product-deatil span.sale { background-color: #21c2f8 } .prod-info-main .product-deatil span.discount { background-color: #71e134 } .prod-info-main .product-deatil span.hot { background-color: #fa9442 } .prod-info-main .description { font-size: 12.5px; line-height: 20px; padding: 10px 14px 16px 19px; background: #fff } .prod-info-main .product-info { padding: 11px 19px 10px 20px } .prod-info-main .product-info a.add-to-cart { color: #2f383d; font-size: 13px; padding-left: 16px } .prod-info-main name.a { padding: 5px 10px; margin-left: 16px } .product-info.smart-form .btn { padding: 6px 12px; margin-left: 12px; margin-top: -10px } .load-more-btn { background-color: #21c2f8; border-bottom: 2px solid #037ca5; border-radius: 2px; border-top: 2px solid #0cf; margin-top: 20px; padding: 9px 0; width: 100% } .product-block .product-deatil p.price-container span, .prod-info-main .product-deatil p.price-container span, .shipping table tbody tr td p.price-container span, .shopping-items table tbody tr td p.price-container span { color: #21c2f8; font-family: Lato, sans-serif; font-size: 24px; line-height: 20px } .product-info.smart-form .rating label { margin-top:15px; } .prod-wrap .product-image span.tag2 { position: absolute; top: 10px; right: 10px; width: 36px; height: 36px; border-radius: 50%; padding: 10px 0; color: #fff; font-size: 11px; text-align: center } .prod-wrap .product-image span.tag3 { position: absolute; top: 10px; right: 20px; width: 60px; height: 36px; border-radius: 50%; padding: 10px 0; color: #fff; font-size: 11px; text-align: center } .prod-wrap .product-image span.sale { background-color: #57889c; } .prod-wrap .product-image span.hot { background-color: #a90329; } .prod-wrap .product-image span.special { background-color: #3B6764; } .shop-btn { position: relative } .shop-btn>span { background: #a90329; display: inline-block; font-size: 10px; box-shadow: inset 1px 1px 0 rgba(0, 0, 0, .1), inset 0 -1px 0 rgba(0, 0, 0, .07); font-weight: 700; border-radius: 50%; padding: 2px 4px 3px!important; text-align: center; line-height: normal; width: 19px; top: -7px; left: -7px } .product-deatil hr { padding: 0 0 5px!important } .product-deatil .glyphicon { color: #3276b1 } .product-deatil .product-image { border-right: 0px solid #fff !important } .product-deatil .name { margin-top: 0; margin-bottom: 0 } .product-deatil .name small { display: block } .product-deatil .name a { margin-left: 0 } .product-deatil .price-container { font-size: 24px; margin: 0; font-weight: 300; } .product-deatil .price-container small { font-size: 12px; } .product-deatil .fa-2x { font-size: 16px!important } .product-deatil .fa-2x>h5 { font-size: 12px; margin: 0 } .product-deatil .fa-2x+a, .product-deatil .fa-2x+a+a { font-size: 13px } .product-deatil .certified { margin-top: 10px } .product-deatil .certified ul { padding-left: 0 } .product-deatil .certified ul li:not(first-child) { margin-left: -3px } .product-deatil .certified ul li { display: inline-block; background-color: #f9f9f9; padding: 13px 19px } .product-deatil .certified ul li:first-child { border-right: none } .product-deatil .certified ul li a { text-align: left; font-size: 12px; color: #6d7a83; line-height: 16px; text-decoration: none } .product-deatil .certified ul li a span { display: block; color: #21c2f8; font-size: 13px; font-weight: 700; text-align: center } .product-deatil .message-text { width: calc(100% - 70px) } @media only screen and (min-width:1024px) { .prod-info-main div[class*=col-md-4] { padding-right: 0 } .prod-info-main div[class*=col-md-8] { padding: 0 13px 0 0 } .prod-wrap div[class*=col-md-5] { padding-right: 0 } .prod-wrap div[class*=col-md-7] { padding: 0 13px 0 0 } .prod-info-main .product-image { border-right: 1px solid #dfe5e9 } .prod-info-main .product-info { position: relative } } HOT Sports Dress Sports </h5> <p class="price-container"> $<span class="price" >199</span> </p> <span class="tag1"></span> </div> <div class="description"> <p class="desc">this is my product desc </p> </div> <div class="product-info smart-form"> <div class="row"> <div class="col-md-12"> <a href="javascript:void(0);" class="btn btn-danger stripe_pay">Buy Now</a> </div> <div class="col-md-12"> <div class="rating">Rating: <label for="stars-rating-5"><i class="fa fa-star text-danger"></i></label> <label for="stars-rating-4"><i class="fa fa-star text-danger"></i></label> <label for="stars-rating-3"><i class="fa fa-star text-danger"></i></label> <label for="stars-rating-2"><i class="fa fa-star text-warning"></i></label> <label for="stars-rating-1"><i class="fa fa-star text-warning"></i></label> </div> </div> </div> </div> </div> </div> </div> <!-- end product --> HOT Travel Natural places Tours $5000 this is my product desc Buy Now </div> <div class="col-md-12"> <div class="rating">Rating: <label for="stars-rating-5"><i class="fa fa-star text-danger"></i></label> <label for="stars-rating-4"><i class="fa fa-star text-danger"></i></label> <label for="stars-rating-3"><i class="fa fa-star text-danger"></i></label> <label for="stars-rating-2"><i class="fa fa-star text-warning"></i></label> <label for="stars-rating-1"><i class="fa fa-star text-warning"></i></label> </div> </div> </div> </div> </div> </div> </div> <!-- end product --> Special Free Food DeliveryFood $50 this is my product desc Buy Now </div> <div class="col-md-12"> <div class="rating">Rating: <label for="stars-rating-5"><i class="fa fa-star text-danger"></i></label> <label for="stars-rating-4"><i class="fa fa-star text-danger"></i></label> <label for="stars-rating-3"><i class="fa fa-star text-danger"></i></label> <label for="stars-rating-2"><i class="fa fa-star text-warning"></i></label> <label for="stars-rating-1"><i class="fa fa-star text-warning"></i></label> </div> </div> </div> </div> </div> </div> </div> <!-- end product --> SALE Bar & Pubs Nightlife $1000 this is my product desc Buy Now </div> <div class="col-md-12"> <div class="rating">Rating: <label for="stars-rating-5"><i class="fa fa-star text-danger"></i></label> <label for="stars-rating-4"><i class="fa fa-star text-danger"></i></label> <label for="stars-rating-3"><i class="fa fa-star text-danger"></i></label> <label for="stars-rating-2"><i class="fa fa-star text-warning"></i></label> <label for="stars-rating-1"><i class="fa fa-star text-warning"></i></label> </div> </div> </div> </div> </div> </div> </div> <!-- end product --> SALE Fashion And Style Fashion $1000 this is my product desc Buy Now </div> <div class="col-md-12"> <div class="rating">Rating: <label for="stars-rating-5"><i class="fa fa-star text-danger"></i></label> <label for="stars-rating-4"><i class="fa fa-star text-danger"></i></label> <label for="stars-rating-3"><i class="fa fa-star text-danger"></i></label> <label for="stars-rating-2"><i class="fa fa-star text-warning"></i></label> <label for="stars-rating-1"><i class="fa fa-star text-warning"></i></label> </div> </div> </div> </div> </div> </div> </div> <!-- end product --> SALE Business Working Style Business $1000 this is my product desc Buy Now </div> <div class="col-md-12"> <div class="rating">Rating: <label for="stars-rating-5"><i class="fa fa-star text-danger"></i></label> <label for="stars-rating-4"><i class="fa fa-star text-danger"></i></label> <label for="stars-rating-3"><i class="fa fa-star text-danger"></i></label> <label for="stars-rating-2"><i class="fa fa-star text-warning"></i></label> <label for="stars-rating-1"><i class="fa fa-star text-warning"></i></label> </div> </div> </div> </div> </div> </div> </div> <form action="pay.php" id="pay_form" method="post"> <input type="hidden" name="price" /> <input type="hidden" name="title" /> <input type="hidden" name="category" /> <input type="hidden" name="image" /> <input type="hidden" name="desc" /> <input type="hidden" name="_pay_" value="1" /> </form> <!-- end product --> <script src="https://code.jquery.com/jquery-1.12.4.min.js" integrity="sha256-ZosEbRLbNQzLpnKIkEdrPv7lOy9C27hHQ+Xp8a4MxAQ=" crossorigin="anonymous"> $(document).ready(function(){ $(".stripe_pay").click(function(){ var obj_prd=$(this).parents('.prod-info-main'); var price=obj_prd.find('.price').text(); var title=obj_prd.find('.title').text(); var desc=obj_prd.find('.desc').text(); var category=obj_prd.find('.category').text(); var img=obj_prd.find('.product-image img').attr('src'); console.log(img) $("input[name='price']").val(price); $("input[name='title']").val(title); $("input[name='desc']").val(desc); $("input[name='category']").val(category); $("input[name='image']").val(img); $("#pay_form").submit(); }); }); </script>Output Screen for this will look like this:Note: you can get products from database also,but here for demonstration i am showing these static. Step 2: Create a Checkout Page with name pay.php, here you need to replace the stripe public key mention in the comment also. Stripe Checkout demo</head> <body> Product title is : Category is : Description is : Amount is :$ " />" /> " data-name="" data-description="" data-image="" data-locale="auto" data-zip-code="true">Output Screen:Step 3: Create a server side script for charge customer named as charge.php with following code, here you need to replace the Stripe private key mention in comment also: FINAL PAYMENT STATUS- STRIPE SERVER SIDE CODE DEMOif(isset($_POST['stripeToken']) && $_POST['stripeToken']!=""){ // Set secret key \Stripe\Stripe::setApiKey("sk_test_g0654565464569");//replace your secreet key of stripe here // Get the credit card details submitted by the form $token = $_POST['stripeToken']; // Create the charge on Stripe's servers - this will charge the user's card try { $customer = \Stripe\Customer::create(array( 'email' => $_POST['stripeEmail'], 'source' => $token )); $charge = \Stripe\Charge::create(array( "amount" => $_POST['stripePrice'], "currency" => "usd", "customer" => $customer->id ));echo "<h1 style='color:green'>PAYMENT SUCCESSFULLY DONE</h1>"; } catch(\Stripe\Error\Card $e) { // The card has been declined echo "PAYMENT FAILED!"; } } ?> Output Screen:Note: there should be a stripe library in the root folder you can download it from here: https://github.com/stripe/stripe-php/archive/v4.7.0.zip and extract it with name stripe as you can see in following screenshotStill you have any problem in integrating you can directly call me and i will send you the complete working code, you can comment here or send me a email on [email protected] Thanks
- Jeetendra Singh
- 28 Jul, 2016
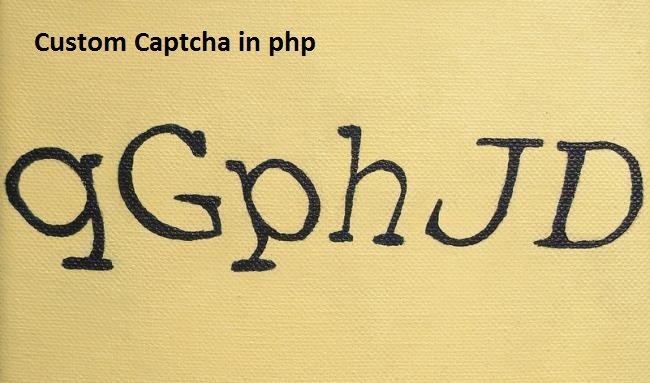
CREATE OWN CAPTCHA FOR YOUR WEBSITE
Hi Geeks, I am sharing you a program forcreating a captcha script using php and javascript. Following are the simple steps to create captcha in php Step 1: Create a php script named ‘captcha.php’ with following code that generate and return a captcha image.Step 2: Now create a captcha.js file and put following code in the file. function reload() { img = document.getElementById("capt"); img.src="captcha.php"; } $(document).ready(function(){ var htm=' '; $('#custom_captcha').html(htm);//set the captcha data in element having id > custom_captcha . you can change as your div/Element id }); Step 3: Now we need to create a Placeholder Element inside the form as following:Step 4: Now after submitting you from validate the captcha was right or not. So in your form submit action use following code.Note 1: In which page/form you are using the capcha , there should be session start in top of the file as following:and also include the js file in your php page head section. jquery should be available before the captcha.js inclusion as following:Note 2: PHP GD LIBRARY SHOULD BE INSTALLED ON YOUR SERVER.

- Jeetendra Singh
- 25 Jul, 2016
Pagination code using php and mysql
Hi Geeks, We have gone through some user requests for pagination code for php mysql project.So we have created a simple class where you can easily create pagination for any grid or listing. following are the simple steps for making a pagination system in php. Step 1: Create a class file ‘Paginator.class.php’ in your project with following code snippet _conn = $conn; $this->_query = $query; $rs= $this->_conn->query( $this->_query ); $this->_total = $rs->num_rows; } public function getData( $limit = 10, $page = 1 ) { $this->_limit = $limit; $this->_page = $page; if ( $this->_limit == 'all' ) { $query = $this->_query; } else { $offset=( ( $this->_page - 1 ) * $this->_limit ); $query = $this->_query . " LIMIT " . $offset . ", $this->_limit"; } $rs = $this->_conn->query( $query ); $results=array(); while ( $row = $rs->fetch_assoc() ) { $results[] = $row; } $result = new stdClass(); $result->page = $this->_page; $result->limit = $this->_limit; $result->total = $this->_total; $result->data = $results; return $result; } public function append_existing_query_string($qstring) { if(isset($_GET)) { foreach($_GET as $k=>$v) { $qstring.="&".$k."=".$v; } } return $qstring; } public function createLinks( $links, $list_class ) { if ( $this->_limit == 'all' ) { return ''; } $last = ceil( $this->_total / $this->_limit ); $start = ( ( $this->_page - $links ) > 0 ) ? $this->_page - $links : 1; $end = ( ( $this->_page + $links ) _page + $links : $last; $html = ''; $class = ( $this->_page == 1 ) ? "disabled" : ""; // $qstring='?limit=' . $this->_limit . '&page=' . ( $this->_page - 1 ); $qstring=$this->append_existing_query_string($qstring); // $html .= '«'; if ( $start > 1 ) { // $qstring='?limit=' . $this->_limit . '&page=1'; $qstring=$this->append_existing_query_string($qstring); // $html .= '1'; $html .= '...'; } for ( $i = $start ; $i _page == $i ) ? "active" : ""; // $qstring='?limit=' . $this->_limit . '&page=' . $i; $qstring=$this->append_existing_query_string($qstring); // $html .= '' . $i . ''; } if ( $end ...'; // $qstring='?limit=' . $this->_limit . '&page=' . $last; $qstring=$this->append_existing_query_string($qstring); // $html .= '' . $last . ''; } $class = ( $this->_page == $last ) ? "disabled" : ""; $qstring='?limit=' . $this->_limit . '&page=' . ( $this->_page + 1 ); $qstring=$this->append_existing_query_string($qstring); $html .= '»'; $html .= 'Total records : '.$this->_total.''; return $html; }} ?> Step 2: Include the paging class before extracting data to showStep 3: Now extract the data for any page as following getData( $limit, $page ); ?> Step 4 : Now we are ready with data. So just showing the data and links as followingShow the data first and after it showing the pagination links as following: <th>Customer Id</th> <th>Customer Name</th> <th>Customer Email</th> <th>Customer Address</th> </tr> </thead> <tbody> <?php if(isset($results) && count( $results->data ) > 0){ for( $i = 0; $i < count( $results->data ); $i++ ) { ?> <tr> <td><?php echo $results->data[$i]['id']; ?></td> <td><?php echo $results->data[$i]['name']; ?></td> <td><?php echo $results->data[$i]['email']; ?></td> <td><?php echo $results->data[$i]['address']; ?></td> </tr> <?php } } ?> </tbody> </table>Show the paging links after the datacreateLinks( $links, $class="pagination"); ?>
- Jeetendra Singh
- 16 May, 2016
form validation library in php
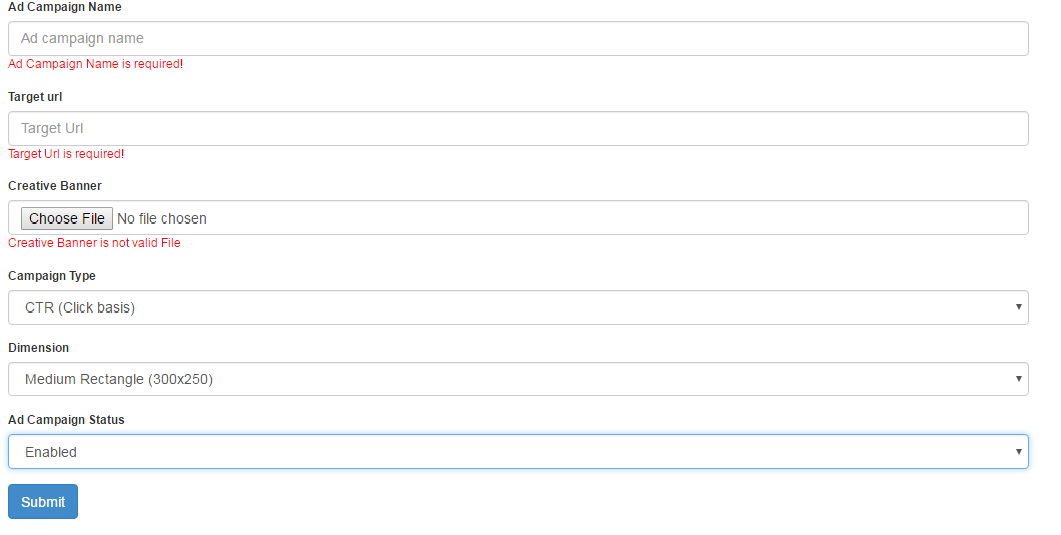
Hi Geeks, Today i am sharing a generic class for Form validation library in php & it also populate if form validation failed. First of all you can download the ‘form validation library in php’ by clicking on following url. https://github.com/g10dra/form_validation_php/blob/master/class.validation.php Now in this class you can validate the require,numeric,file-extension,match password & confirm password,validate url and other validation also. It is having a validation with database like is_unique in mysql database where you need pass the db connection if you want to user is_unique validation. Step 1: Include & Initialize the class in header or before your form s following: //include the form validation class// require 'class.validation.php'; or any of your path where you have save the class $db_details=array();//array for db details for validation some fields like is_unique from DB. //pass the varribale dynamic or static $db_details['db_host']=DB_HOST; $db_details['db_user']=DB_USER; $db_details['db_password']=DB_PASS; $db_details['db_name']=DB_NAME; $validation= new validation($db_details); // Step 2: Create a HTML FORM we are assuming that we have a form for add/edit ‘Advertise campaign’ form Read the full comments in code Add / Update Campaign num_rows( $query ) > 0 ) { $_edited_data = $database->get_results( $query ); $_edited_data=$_edited_data[0]; } else{ header("location:campaign.php?err=something bad happen !"); } } else { //add time initialize the blank data in edit data varriable ,if we are add action $_edited_data=array(); $_edited_data['ad_name']=""; $_edited_data['end_url']=""; $_edited_data['campaign_type']=""; $_edited_data['dimension']=""; $_edited_data['is_active']=""; } ?> </div> <div class="panel-body"> <form enctype="multipart/form-data" method="post"> <input type="hidden" name="is_post" value="1" /> <!-- field for detecting if form is submitted or not --> <input type="hidden" name="edit_id" value="<?php echo (isset($_GET['id']))? $_GET['id'] : "0"; ?>" /> <!-- field for detecting if form is submitted in edit or add mode --> <fieldset> <div class="form-group"> <label>Ad Campaign Name</label> <input value="<?php echo $validation->set_val("ad_name",$_edited_data['ad_name']); ?>" name="ad_name" class="form-control" placeholder="Ad campaign name" type="text"> <?php echo $validation->error_message("ad_name","<span style='color:red'>"); ?> <!-- $validation->set_val() is having 2 parameter 1st is a field name and second is for default value or edit mode populated value.//This method used to populate the text field value $validation->error_message() is having 2 params first is the field name and second is the opening tag of html tag where error should show in designed form,do not clode the tag it will autoclose the opened tag passed over it. --> </div> <div class="form-group"> <label>Target url</label> <input value="<?php echo $validation->set_val("end_url",$_edited_data['end_url']); ?>" name="end_url" class="form-control" placeholder="Target Url" type="text"> <?php echo $validation->error_message("end_url","<span style='color:red'>"); ?> </div> <div class="form-group"> <label>Creative Banner</label> <input class="form-control" name="ad_media_file" type="file" > <?php if(isset($_edited_data['ad_media_file']) && $_edited_data['ad_media_file']!="") { echo '<img style="max-width:300px;height:auto" src="AD_MEDIA/'.$_edited_data['ad_media_file'].'" />'; } echo $validation->error_message("ad_media_file","<span style='color:red'>"); ?> </div> <div class="form-group"> <label>Campaign Type</label> <select <?php if(isset($_GET['id']) && $_GET['id']!=""){ echo "disabled"; } ?> name="campaign_type" class="form-control input-md"> <option <?php echo $validation->set_select("campaign_type","1",$_edited_data['campaign_type']); ?> value="1">CTR (Click basis)</option> <option <?php echo $validation->set_select("campaign_type","2",$_edited_data['campaign_type']); ?> value="2">CPM (impression every 1k)</option> </select> <!-- $validation->set_select() is having 3 params for first is field name second is for seting selected=selected if value matched in failed post, and third is for seleted by default in edit mode --> </div> </div> <div class="form-group"> <label>Ad Campaign Status </label> <select name="is_active" class="form-control input-md"> <option <?php echo $validation->set_select("is_active","1",$_edited_data['is_active']); ?> value="1">Enabled</option> <option <?php echo $validation->set_select("is_active","0",$_edited_data['is_active']); ?> value="0">Disabled</option> </select> </div> </fieldset> <div> <button type="submit" class="btn btn-primary"> <i class="fa fa-save"></i> Submit </button> </div> </form> </div> </div>Step 3: Create a Table for advertise add/edit using following sql dump CREATE TABLE IF NOT EXISTS tbl_ads ( a_id int(11) NOT NULL AUTO_INCREMENT, user_id int(11) NOT NULL, ad_name varchar(255) NOT NULL, ad_media_file text NOT NULL, end_url tinytext NOT NULL, total_impression int(11) NOT NULL, campaign_type enum('1','2') NOT NULL COMMENT '1 for click base 2 for impression', is_active enum('0','1') NOT NULL DEFAULT '1', approved enum('0','1') NOT NULL DEFAULT '0', is_delete enum('0','1') NOT NULL DEFAULT '0', added_date datetime NOT NULL, updated_date datetime NOT NULL, remark text NOT NULL, PRIMARY KEY (a_id) ) ENGINE=InnoDB DEFAULT CHARSET=latin1 AUTO_INCREMENT=1 ; Step 4: Now need to post the form and recieve data and show errors, Recieve post Before the HTML form if(isset($_POST['is_post'])) //check form is posted { extract($_POST);//extract the form in its filed name vars using php function extract //now create a is_unique rule for ad name for AD/EDIT MOde both if(isset($edit_id) && $edit_id!=0)//it means it is in edit mode { $is_unique_expression="tbl_ads::ad_name::a_id!=".$edit_id; } else { $is_unique_expression="tbl_ads::ad_name"; } /* So for -> is_unique_expression :: First data is for table_name second is for column_name to match third is for where_condition in edit case or any specific requirement (optional) ALl are seperated with :: (double colon) / //validation rules $config_validation=array( array('field'=>"ad_name", "label"=>"Ad Campaign Name", "rules"=>"required|is_unique[".$is_unique_expression."]", ), array('field'=>"campaign_type", "label"=>"Campaign Type", "rules"=>"required", ), array('field'=>"is_active", "label"=>"Ad Campaign Status", "rules"=>"required", ), array('field'=>"ad_media_file", "label"=>"Creative Banner", "rules"=>"file_required|valid_file[AD_MEDIA::png,jpg,jpeg,gif]", ), array('field'=>"end_url", "label"=>"Target Url", "rules"=>"required|valid_url", ) ); //rule names must seperated with pipe | / rule => usage required => means must required item valid_url => used for validate a url format file_required => user to set must upload validation for a input type file valid_file => valid file passes a string for validate file time in [] fist is the folder name seperated with double column :: second is for extnsions seperated with comma (,) is_unique => used for matching value already exist in database or not for both edit and add case, in edit case we can pass the extra where case for self safe */ //now pass the configuration array of fileds $validation->init($config_validation); //if form successfully submitted by passing all rules// if($validation->form_success==1) { //do whatever want to do if(isset($edit_id) && $edit_id!=0) //detect it is in edit mode { $ad_media_file = (isset($validation->return_array['ad_media_file']))?$validation->return_array['ad_media_file']:""; //$validation->return_array is a array set the key with file field name if file successfully posted. //means it set the file field name key in '$validation->return_array' with input type file name. //so we can get the uploaded file name by passing the file type field name in $validation->return_array like this >> $validation->return_array['ad_media_file']; //this is save action when we edit any item $date=date('Y-m-d H:i:s'); $update = array( 'ad_name' => $ad_name, 'is_active' => $is_active, 'dimension' => $dimension, 'end_url' => $end_url, 'updated_date' => $date ); if($ad_media_file!="") { $update['ad_media_file'] = $ad_media_file; } //Add the WHERE clauses $where_clause = array( 'a_id' => $edit_id ); $updated = $database->update( 'tbl_ads', $update, $where_clause, 1 ); if( $updated ) { header('location:campaign.php?msg=Ad Campaign Updated Successfully!'); } } else { //detect that form post done for add a new campaign $ad_media_file = $validation->return_array['ad_media_file']; //this is add action where we add new item $date=date('Y-m-d H:i:s'); $data = array( 'ad_name' => $ad_name, 'campaign_type' => $campaign_type, 'user_id' => $_SESSION['user_id'], 'is_active' => $is_active, 'dimension' => $dimension, 'ad_media_file' => $ad_media_file, 'end_url' => $end_url, 'added_date' => $date, 'updated_date' => $date ); $add_query = $database->insert( 'tbl_ads', $data ); if( $add_query ) { header('location:campaign.php?msg=Ad Campaign Added Successfully!'); } } //do whatever want to do } else{ //echo ""; //print_r($validation->errors_array); //die; //$validation->errors_array is the complete array with all errors of form. } } Please Comment If any problem in this. I’ll assist you to use this form validation library
- Jeetendra Singh
- 14 Apr, 2016
Verify Email is Exists in real world or not ,Download Php code
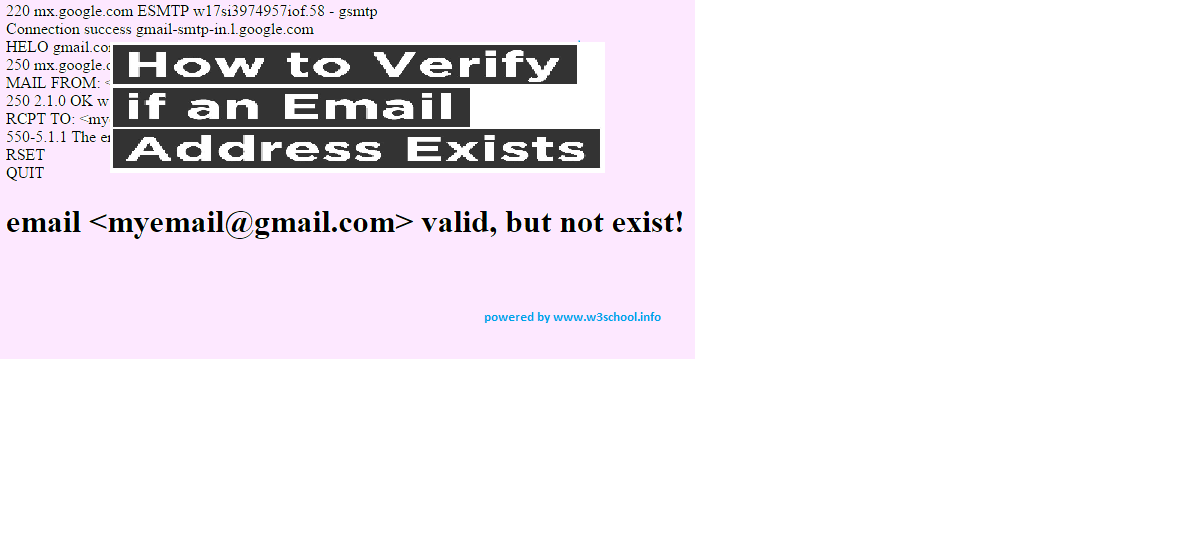
Hi Geeks, As per need in one of my project, i have used following code for Check Email is Exists in real world or not . In this tutorial we have made a class for checking a email id is exists or not and also checking it is valid or not. and we have a example file also for calling the verify method. You can also download full source code from link given at bottom of the post. Step 1: Create a class with name ‘class.verifyEmail.php’ having following code snippet. * @copyright Copyright (c) 2015, w3school.info */ class verifyEmail { protected $stream = false; /** * SMTP port number * @var int */ protected $port = 25; /** * email address for request * @var string */ protected $from = 'root@localhost'; /** * The connection timeout, in seconds. * @var int */ protected $max_connection_timeout = 30; /** * Timeout value on stream, in seconds. * @var int */ protected $stream_timeout = 5; /** * Wait timeout on stream, in seconds. * * 0 - not wait * @var int */ protected $stream_timeout_wait = 0; /** * Whether to throw exceptions for errors. * @type boolean * @access protected */ protected $exceptions = false; /** * The number of errors encountered. * @type integer * @access protected */ protected $error_count = 0; /** * class debug output mode. * @type boolean */ public $Debug = false; /** * How to handle debug output. * Options: * * `echo` Output plain-text as-is, appropriate for CLI * * `html` Output escaped, line breaks converted to ``, appropriate for browser output * * `log` Output to error log as configured in php.ini * @type string */ public $Debugoutput = 'echo'; /** * SMTP RFC standard line ending. */ const CRLF = "\r\n"; /** * Holds the most recent error message. * @type string */ public $ErrorInfo = ''; /** * Constructor. * @param boolean $exceptions Should we throw external exceptions? */ public function __construct($exceptions = false) { $this->exceptions = (boolean) $exceptions; } /** * Set email address for SMTP request * @param string $email Email address */ public function setEmailFrom($email) { if (!self::validate($email)) { $this->set_error('Invalid address : ' . $email); $this->edebug($this->ErrorInfo); if ($this->exceptions) { throw new verifyEmailException($this->ErrorInfo); } } $this->from = $email; } /** * Set connection timeout, in seconds. * @param int $seconds */ public function setConnectionTimeout($seconds) { if ($seconds > 0) { $this->max_connection_timeout = (int) $seconds; } } /** * Sets the timeout value on stream, expressed in the seconds * @param int $seconds */ public function setStreamTimeout($seconds) { if ($seconds > 0) { $this->stream_timeout = (int) $seconds; } } public function setStreamTimeoutWait($seconds) { if ($seconds >= 0) { $this->stream_timeout_wait = (int) $seconds; } } /** * Validate email address. * @param string $email * @return boolean True if valid. */ public static function validate($email) { return (boolean) filter_var($email, FILTER_VALIDATE_EMAIL); } /** * Get array of MX records for host. Sort by weight information. * @param string $hostname The Internet host name. * @return array Array of the MX records found. */ public function getMXrecords($hostname) { $mxhosts = array(); $mxweights = array(); if (getmxrr($hostname, $mxhosts, $mxweights) === FALSE) { $this->set_error('MX records not found or an error occurred'); $this->edebug($this->ErrorInfo); } else { array_multisort($mxweights, $mxhosts); } /** * Add A-record as last chance (e.g. if no MX record is there). * Thanks Nicht Lieb. * @link http://www.faqs.org/rfcs/rfc2821.html RFC 2821 - Simple Mail Transfer Protocol */ if (empty($mxhosts)) { $mxhosts[] = $hostname; } return $mxhosts; } /** * Parses input string to array(0=>user, 1=>domain) * @param string $email * @param boolean $only_domain * @return string|array * @access private */ public static function parse_email($email, $only_domain = TRUE) { sscanf($email, "%[^@]@%s", $user, $domain); return ($only_domain) ? $domain : array($user, $domain); } /** * Add an error message to the error container. * @access protected * @param string $msg * @return void */ protected function set_error($msg) { $this->error_count++; $this->ErrorInfo = $msg; } /** * Check if an error occurred. * @access public * @return boolean True if an error did occur. */ public function isError() { return ($this->error_count > 0); } /** * Output debugging info * Only generates output if debug output is enabled * @see verifyEmail::$Debugoutput * @see verifyEmail::$Debug * @param string $str */ protected function edebug($str) { if (!$this->Debug) { return; } switch ($this->Debugoutput) { case 'log': //Don't output, just log error_log($str); break; case 'html': //Cleans up output a bit for a better looking, HTML-safe output echo htmlentities( preg_replace('/[\r\n]+/', '', $str), ENT_QUOTES, 'UTF-8' ) . "\n"; break; case 'echo': default: //Normalize line breaks $str = preg_replace('/(\r\n|\r|\n)/ms', "\n", $str); echo gmdate('Y-m-d H:i:s') . "\t" . str_replace( "\n", "\n \t ", trim($str) ) . "\n"; } } /** * check up e-mail * @param string $email Email address * @return boolean True if the valid email also exist */ public function check($email) { $result = FALSE; if (!self::validate($email)) { $this->set_error("{$email} incorrect e-mail"); $this->edebug($this->ErrorInfo); if ($this->exceptions) { throw new verifyEmailException($this->ErrorInfo); } return FALSE; } $this->error_count = 0; // Reset errors $this->stream = FALSE; $mxs = $this->getMXrecords(self::parse_email($email)); $timeout = ceil($this->max_connection_timeout / count($mxs)); foreach ($mxs as $host) { /** * suppress error output from stream socket client... * Thanks Michael. */ $this->stream = @stream_socket_client("tcp://" . $host . ":" . $this->port, $errno, $errstr, $timeout); if ($this->stream === FALSE) { if ($errno == 0) { $this->set_error("Problem initializing the socket"); $this->edebug($this->ErrorInfo); if ($this->exceptions) { throw new verifyEmailException($this->ErrorInfo); } return FALSE; } else { $this->edebug($host . ":" . $errstr); } } else { stream_set_timeout($this->stream, $this->stream_timeout); stream_set_blocking($this->stream, 1); if ($this->_streamCode($this->_streamResponse()) == '220') { $this->edebug("Connection success {$host}"); break; } else { fclose($this->stream); $this->stream = FALSE; } } } if ($this->stream === FALSE) { $this->set_error("All connection fails"); $this->edebug($this->ErrorInfo); if ($this->exceptions) { throw new verifyEmailException($this->ErrorInfo); } return FALSE; } $this->_streamQuery("HELO " . self::parse_email($this->from)); $this->_streamResponse(); $this->_streamQuery("MAIL FROM: from}>"); $this->_streamResponse(); $this->_streamQuery("RCPT TO: "); $code = $this->_streamCode($this->_streamResponse()); //$this->_streamResponse(); $this->_streamQuery("RSET"); //$this->_streamResponse(); $this->_streamQuery("QUIT"); fclose($this->stream); switch ($code) { case '250': /** * http://www.ietf.org/rfc/rfc0821.txt * 250 Requested mail action okay, completed * email address was accepted */ case '450': case '451': case '452': /** * http://www.ietf.org/rfc/rfc0821.txt * 450 Requested action not taken: the remote mail server * does not want to accept mail from your server for * some reason (IP address, blacklisting, etc..) * Thanks Nicht Lieb. * 451 Requested action aborted: local error in processing * 452 Requested action not taken: insufficient system storage * email address was greylisted (or some temporary error occured on the MTA) * i believe that e-mail exists */ return TRUE; default : return FALSE; } } /** * writes the contents of string to the file stream pointed to by handle * If an error occurs, returns FALSE. * @access protected * @param string $string The string that is to be written * @return string Returns a result code, as an integer. */ protected function _streamQuery($query) { $this->edebug($query); return stream_socket_sendto($this->stream, $query . self::CRLF); } /** * Reads all the line long the answer and analyze it. * If an error occurs, returns FALSE * @access protected * @return string Response */ protected function _streamResponse($timed = 0) { $reply = stream_get_line($this->stream, 1); $status = stream_get_meta_data($this->stream); if (!empty($status['timed_out'])) { $this->edebug("Timed out while waiting for data! (timeout {$this->stream_timeout} seconds)"); } if ($reply === FALSE && $status['timed_out'] && $timed stream_timeout_wait) { return $this->_streamResponse($timed + $this->stream_timeout); } if ($reply !== FALSE && $status['unread_bytes'] > 0) { $reply .= stream_get_line($this->stream, $status['unread_bytes'], self::CRLF); } $this->edebug($reply); return $reply; } /** * Get Response code from Response * @param string $str * @return string */ protected function _streamCode($str) { preg_match('/^(?[0-9]{3})(\s|-)(.*)$/ims', $str, $matches); $code = isset($matches['code']) ? $matches['code'] : false; return $code; }}/** * verifyEmail exception handler */ class verifyEmailException extends Exception { /** * Prettify error message output * @return string */ public function errorMessage() { //$errorMsg = '' . $this->getMessage() . "\n"; $errorMsg = $this->getMessage(); return $errorMsg; }}?>Step 2. Now you can call the method after including the above class in any php file as follow: setStreamTimeoutWait(20); $vmail->Debug= TRUE; $vmail->Debugoutput= 'html'; $vmail->setEmailFrom('[email protected]');//email which is used to set from headers,you can add your own/company email over here if ($vmail->check($email)) { echo 'email exist!'; } elseif (verifyEmail::validate($email)) { echo 'email valid, but not exist!'; } else { echo 'email not valid and not exist!'; } ?>Now This is our example file where we have passed the email to be check through url parameter and just got the value using GET/REQUEST using php So create a file index.php with following code CHECK EMAIL IS EXISTS LIVE OR NOT <?php include_once 'class.verifyEmail.php'; // $email = $_REQUEST['email']; //pass an email here to test // $vmail = new verifyEmail(); $vmail->setStreamTimeoutWait(20); $vmail->Debug= TRUE; $vmail->Debugoutput= 'html'; $vmail->setEmailFrom('[email protected]'); if ($vmail->check($email)) { echo '<h1>email <' . $email . '> exist!</h1>'; } elseif (verifyEmail::validate($email)) { echo '<h1>email <' . $email . '> valid, but not exist!</h1>'; } else { echo '<h1>email <' . $email . '> not valid and not exist!</h1>'; } ?> </body>STEP 3. Now check the email using url as following http://localhost/email_verify/[email protected] STEP 3. Now check the email using url as following localhost/email_verify/[email protected] Now you can see the output and able to detect email is valid or now see results output – email verify [viraldownloader id=165 text=’Download Source Code’]
- Jeetendra Singh
- 20 Feb, 2016
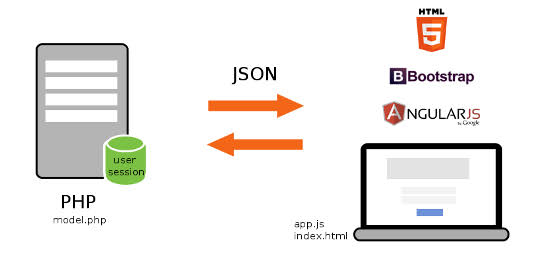
How to work with AngularJS as frontend and PHP MYSQL as backend
Hi Geeks, In this tutorial you will learn that how to work with AngularJs as web frontend or in any hybrid app and get retrieve data from database using php and mysql. We have created restful webservice for return records to angular app. Now steps for making a angularjs app with php and mysql – Step 1) Create a database and table for fetching content from the table Note: If you want to use existing database then select you db else create a new db with ‘news_db’ or whatever you want to take a db name. Now Create a table named ‘news’ for getting data by following sql statement CREATE TABLE IF NOT EXISTS news ( id int(12) NOT NULL AUTO_INCREMENT, title varchar(255) NOT NULL, permalink varchar(255) NOT NULL, details text NOT NULL, thumbnail varchar(255) NOT NULL, category_id int(12) NOT NULL, source_id int(12) NOT NULL, datetime int(12) NOT NULL, day int(2) NOT NULL, month int(2) NOT NULL, year int(4) NOT NULL, hits int(12) NOT NULL, published int(1) NOT NULL, PRIMARY KEY (id) ) ENGINE=MyISAM DEFAULT CHARSET=utf8 AUTO_INCREMENT=1; Now Dump some dummy records by following insert statement: -- -- Dumping data for table news INSERT INTO news (id, title, permalink, details, thumbnail, category_id, source_id, datetime, day, month, year, hits, published) VALUES (1, 'MY NEWS TITLE 1', '', 'The standard chunk of Lorem Ipsum used since the 1500s is reproduced below for those interested. Sections 1.10.32 and 1.10.33 ', '11621455015936.jpg', 1, 0, 1455015936, 9, 2, 2016, 45, 1), (2, 'MY NEWS TITLE 2', '', 'Lorem Ipsum is simply dummy text of the printing and typesetting industry. ', '76911455015952.jpg', 2, 0, 1455015952, 9, 2, 2016, 73, 0); Step 2) Create a file named config.php with following codechange credential according to your database and server host Step 3) Now create a file for webservices named wsdl.php Define Cross origin headers in this file by following codeNow code for getting data from database and provide in restful json format by following code query("SELECT title,details,hits FROM news"); $data=array(); while($rs = $result->fetch_array(MYSQLI_ASSOC)) { $row=array(); $row['title']=addslashes($rs["title"]); $row['details']=addslashes($rs["details"]); $row['hits']=addslashes($rs["hits"]); $data[]=$row; } $jsonData=array(); $jsonData['records']=$data; $conn->close(); echo json_encode($jsonData);} ?>So complete Code for wsdl.php is following query("SELECT title,details,hits FROM news"); $data=array(); while($rs = $result->fetch_array(MYSQLI_ASSOC)) { $row=array(); $row['title']=addslashes($rs["title"]); $row['details']=addslashes($rs["details"]); $row['hits']=addslashes($rs["hits"]); $data[]=$row; } $jsonData=array(); $jsonData['records']=$data; $conn->close(); echo json_encode($jsonData);} ?>Step 4) Now Start with frontend Step for Getting data from database using angularjs as frontend and php & mysql as backed make a file named index.html include the script which i have attached with this postNow make a ng-app with following htmlmake a html table format inside the div for getting data from datasource(php/mysql restful service) as following {{ x.title }} {{ x.details }} {{ x.hits }}Now put the script that call the restful web service and load data to the tablevar app = angular.module('myApp', []); app.controller('newsCtrl', function($scope, $http) { $http.get("http://localhost/angular/wsdl.php?method=load_news") .then(function (response) {$scope.names = response.data.records;}); });Now complete Code for index.html {{ x.title }} {{ x.details }} {{ x.hits }}var app = angular.module('myApp', []); app.controller('newsCtrl', function($scope, $http) { $http.get("http://localhost/angular/wsdl.php?method=load_news") .then(function (response) {$scope.names = response.data.records;}); });Congratulations you have completed with this tutorial please provide comments for this tutorial. [viraldownloader id=146 text=’DOWNLOAD COMPLETE CODE’]

- Jeetendra Singh
- 09 Feb, 2016
Array to Xml Conversion and Xml to Array Convert in PHP
Hi Geeks, Today i am sharing you a code snippet for converting xml to array with attributes also and vice versa (Convert array to xml). This class is very useful to parse rss feed and to make rss feed in php programming. In this code snippet we have made a class to convert array XML using php code and also retaining its attibues stored into array . It returns the XML in form of DOMDocument class for further manipulation. This class will throw exception if the tag name or attribute name has illegal characters. Usage of this class: //convert array to xml// $php_array = array ();//this is your array data ,it comes from database also or you can define elements in php code also. $root_node="ROOT";//root node of the xml tree like//root , data or anything you want to make super parent tag for the xml $xml = Array2XML::createXML($root_node, $php_array);// echo $xml->saveXML(); //convert xml to array// $xmlstring='';//this varribale will contain xml string $xml_data = Array2XML::XML_TO_ARR($xmlstring);// A. Steps for Convert Array to Xml 1.Create a class named Array2XML with following code in file Array2XML.php formatOutput = $format_output; self::$encoding = $encoding; } /** * Convert an Array to XML * @param string $node_name - name of the root node to be converted * @param array $arr - aray to be converterd * @return DomDocument */ public static function &createXML($node_name, $arr=array()) { $xml = self::getXMLRoot(); $xml->appendChild(self::convert($node_name, $arr)); self::$xml = null; // clear the xml node in the class for 2nd time use. return $xml; } /** * Convert an Array to XML * @param string $node_name - name of the root node to be converted * @param array $arr - aray to be converterd * @return DOMNode */ private static function &convert($node_name, $arr=array()) { //print_arr($node_name); $xml = self::getXMLRoot(); $node = $xml->createElement($node_name); if(is_array($arr)){ // get the attributes first.; if(isset($arr['@attributes'])) { foreach($arr['@attributes'] as $key => $value) { if(!self::isValidTagName($key)) { throw new Exception('[Array2XML] Illegal character in attribute name. attribute: '.$key.' in node: '.$node_name); } $node->setAttribute($key, self::bool2str($value)); } unset($arr['@attributes']); //remove the key from the array once done. } // check if it has a value stored in @value, if yes store the value and return // else check if its directly stored as string if(isset($arr['@value'])) { $node->appendChild($xml->createTextNode(self::bool2str($arr['@value']))); unset($arr['@value']); //remove the key from the array once done. //return from recursion, as a note with value cannot have child nodes. return $node; } else if(isset($arr['@cdata'])) { $node->appendChild($xml->createCDATASection(self::bool2str($arr['@cdata']))); unset($arr['@cdata']); //remove the key from the array once done. //return from recursion, as a note with cdata cannot have child nodes. return $node; } } //create subnodes using recursion if(is_array($arr)){ // recurse to get the node for that key foreach($arr as $key=>$value){ if(!self::isValidTagName($key)) { throw new Exception('[Array2XML] Illegal character in tag name. tag: '.$key.' in node: '.$node_name); } if(is_array($value) && is_numeric(key($value))) { // MORE THAN ONE NODE OF ITS KIND; // if the new array is numeric index, means it is array of nodes of the same kind // it should follow the parent key name foreach($value as $k=>$v){ $node->appendChild(self::convert($key, $v)); } } else { // ONLY ONE NODE OF ITS KIND $node->appendChild(self::convert($key, $value)); } unset($arr[$key]); //remove the key from the array once done. } } // after we are done with all the keys in the array (if it is one) // we check if it has any text value, if yes, append it. if(!is_array($arr)) { $node->appendChild($xml->createTextNode(self::bool2str($arr))); } return $node; } /* * Get the root XML node, if there isn't one, create it. */ private static function getXMLRoot(){ if(empty(self::$xml)) { self::init(); } return self::$xml; } /* * Get string representation of boolean value */ private static function bool2str($v){ //convert boolean to text value. $v = $v === true ? 'true' : $v; $v = $v === false ? 'false' : $v; return $v; } /* * Check if the tag name or attribute name contains illegal characters * Ref: http://www.w3.org/TR/xml/#sec-common-syn */ private static function isValidTagName($tag){ $pattern = '/^[a-z_]+[a-z0-9\:\-\.\_]*[^:]*$/i'; return preg_match($pattern, $tag, $matches) && $matches[0] == $tag; } /* * Convert xml string into array. */ public static function XML_TO_ARR($xmlstring) { $xml = simplexml_load_string($xmlstring, "SimpleXMLElement", LIBXML_NOCDATA); $json = json_encode($xml); $array = json_decode($json,TRUE); return $array; } } ?>Now Include the classDefining Array or get it from database then call the createXML method for generating xml file$data_array = array( '@attributes' => array( 'type' => 'fiction' ), 'book' => array( array( '@attributes' => array( 'author' => 'Jeetendra Singh' ), 'title' => 'Learning PHP programming', 'price' => 'Free' ), array( '@attributes' => array( 'author' => 'Shailesh Verma' ), 'title' => 'Linux Aspects', 'price' => '$15.61' ), array( '@attributes' => array( 'author' => 'Eric Basendra' ), 'title' => 'IOS Dev', 'Company' => 'Oxilo India', 'price' => array( '@attributes' => array( 'discount' => '10%' ), '@value' => '$18.00' ) ) ) ); Now Call createXML method as following $root_node="data";//root node of the xml tree like//root , data or anything you want to make super parent tag for the xml $xml = Array2XML::createXML($root_node, $data_array);// $xml_STR = $xml->saveXML();// put string in xml_STR $xml->save('array_to_xml_convert.xml'); // save data in array_to_xml_convert.xml file B. Steps for Convert Xml to ArrayDefine the xml oe get the xml string into a varribale$xmlstring=' 4 first second fifth sub1 sub2 sub3 1234 '; Or $xmlstring=file_get_contents('myxml_file_path.xml');//get the string load into a varriable using file_get_contents method of php 2.Now call the XML_TO_ARR function as following $Array_Data = Array2XML::XML_TO_ARR($xmlstring);//pass the xml string print_r($Array_Data);//print your array [viraldownloader id=138 text=’DOWNLOAD COMPLETE CODE’]
- Jeetendra Singh
- 19 Jan, 2016
Progress bar for php form post , Download the Code
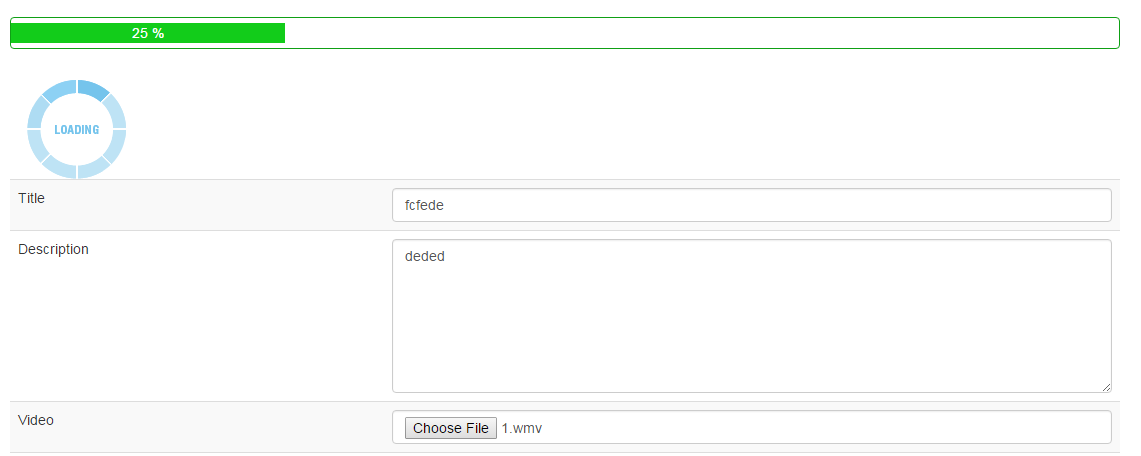
Hi Geeks, Now php has a feature for tracking the progress of multipart form submit. we can show the progress in percentage for user convenience .you can download the source code if you want to create progress bar in php form. Following are the steps to create a progress bar for php form post. Step 1. Add script and css for upload progress functionality workingStep 2. Form Tag should look likeNote: form id we have used myform so if you want to change the form id then you need to change in upload_script.js file also Step 3. Add the placement for showing progress barStep 4. In your upload or form post action you can add your code for demo purpose we have use as following:[viraldownloader id=126 text=’Download the Source code by sharing us on facebook.’]

- Jeetendra Singh
- 10 Jan, 2016
Text to Image Convert using php code . Download source Code
Hi Geeks, In this tutorial we will learn that how to Create and save dynamic image in php using gd library or Text to Image Convert using php code . in this example we have a requirement to create a image with specific width and height and specific background and watermark also. So that we have created a PHP Class to generate and save the image to specific folder or path. please follow the steps to achive this task. Step 1. Create a class file for generate image with name class.img.php with following code: _font1=$font_1; $this->_font2=$font_2; $this->_font_size=$font_size; $this->_font_size_watermark=$font_size_watermark;}public function imagettftext_cr(&$im, $size, $angle, $x, $y, $color, $fontfile, $text) { // retrieve boundingbox $bbox = imagettfbbox($size, $angle, $fontfile, $text); // calculate deviation $dx = ($bbox[2]-$bbox[0])/2.0 - ($bbox[2]-$bbox[4])/2.0; // deviation left-right $dy = ($bbox[3]-$bbox[1])/2.0 + ($bbox[7]-$bbox[1])/2.0; // deviation top-bottom // new pivotpoint $px = $x-$dx; $py = $y-$dy; return imagettftext($im, $size, $angle, $px, $y, $color, $fontfile, $text); }public function generate_img($name,$savepath,$size_arr,$watermark,$rgb=array("34","96","76")) {$image = imagecreate($size_arr['width'],$size_arr['height']); $rgb_background = imagecolorallocate($image,$rgb[0],$rgb[1],$rgb[2]); $grey_shade = imagecolorallocate($image,40,40,40); $white = imagecolorallocate($image,255,255,255);// Local font files, relative to script $otherFont = $this->_font1; $font = $this->_font2;$i=0; while($iimagettftext_cr($image,12,$this->_font_size_watermark,rand(100,500),rand(200,500),$grey_shade,$otherFont,$watermark); $i++; }// Main Text$w=$size_arr['width'] / 2 ; $h=$size_arr['height'] / 2 ;$this->imagettftext_cr($image,$this->_font_size,0,$w,$h,$white,$font,$name); $this->imagettftext_cr($image,$this->_font_size_watermark,0,$w,$h+30,$white,$otherFont,$watermark); imagejpeg($image,$savepath);}} ?>Step 2. make another php file with any name. and include the class file as follow:Now create a instance of img class with font file names and sizes as following :Init with font files and font sizes as follow:Now generate a single image as follow: "500","height"=>"500"); //define height and width $savepath="images/my_image_test.jpg"; $watermark="w3school test"; $rgb=array("0","0","0");//define a black rgb scheme $img_obj->generate_img($text_to_image,$savepath,$size_arr,$watermark,$rgb); //call the generate image ?>Generate multiple images in loop as following code : "1366","height"=>"768"); //define height and width $savepath="images/".$img_name.".jpg"; $watermark="w3school test watermark"; $rgb=array("34","96","76");//define a light green rgb scheme $img_obj->generate_img($title,$savepath,$size_arr,$watermark,$rgb); //call the generate image function // } ?>Complete Code of above snippets: "500","height"=>"500"); //define height and width $savepath="images/my_image_test.jpg"; $watermark="w3school test"; $rgb=array("0","0","0");//define a black rgb scheme $img_obj->generate_img($text_to_image,$savepath,$size_arr,$watermark,$rgb); //call the generate image //now generate a single image //generate multiple images in loop$text=array("MY IMAGE TEXT 1","MY IMAGE TEXT 2","MY IMAGE TEXT 3","MY IMAGE TEXT 4","MY IMAGE TEXT 5",); foreach($text as $title) { // $img_name=strtolower(str_replace(" ","-",$title)); $size_arr=array("width"=>"1366","height"=>"768"); //define height and width $savepath="images/".$img_name.".jpg"; $watermark="w3school test watermark"; $rgb=array("34","96","76");//define a light green rgb scheme $img_obj->generate_img($title,$savepath,$size_arr,$watermark,$rgb); //call the generate image function // }//generate multiple images in loop?>[viraldownloader id=113 text=’Download the Complete Code by Sharing this post and click on generate button after sharing’] Note: please confirm GD library on your php server. and create a images folder in project with 755 or 775 or 777 permissions.

- Jeetendra Singh
- 22 Dec, 2015
How to make a news aggregator website
Hi Geeks, I am Sharing you the code for reading a rss feed using php script. Following are the Steps to make a news aggregator website using rss reader in php Step 1: Create a form having Rss Urls in select box as following Choose category :Select India News World News Science NewsStep 2. Php code to recieve the submitted post and rss url. and get the rss output in object and parse the feed or rss using the dom document class and accessing the properties as following: Search Result for rss url:'.$_POST['rssurl'].''; $rssurl=$_POST['rssurl']; $rss = new DOMDocument(); $rss->load($rssurl); $feed = array(); foreach ($rss->getElementsByTagName('item') as $node) { $item = array ( 'title' => $node->getElementsByTagName('title')->item(0)->nodeValue, 'desc' => $node->getElementsByTagName('description')->item(0)->nodeValue, 'link' => $node->getElementsByTagName('link')->item(0)->nodeValue, 'date' => $node->getElementsByTagName('pubDate')->item(0)->nodeValue, ); array_push($feed, $item); } $limit = 5; for($x=0;$x'.$title.''; echo 'Posted on '.$date.''; echo ''.$description.''; } } ?>Final Complete Code: Choose category :Select India News World News Science Newsif(isset($_POST['rssurl'])) { echo 'Search Result for rss url:'.$_POST['rssurl'].''; $rssurl=$_POST['rssurl']; $rss = new DOMDocument(); $rss->load($rssurl); $feed = array(); foreach ($rss->getElementsByTagName('item') as $node) { $item = array ( 'title' => $node->getElementsByTagName('title')->item(0)->nodeValue, 'desc' => $node->getElementsByTagName('description')->item(0)->nodeValue, 'link' => $node->getElementsByTagName('link')->item(0)->nodeValue, 'date' => $node->getElementsByTagName('pubDate')->item(0)->nodeValue, ); array_push($feed, $item); } $limit = 5; for($x=0;$x<$limit;$x++) { $title = str_replace(' & ', ' & ', $feed[$x]['title']); $link = $feed[$x]['link']; $description = $feed[$x]['desc']; $date = date('l F d, Y', strtotime($feed[$x]['date'])); echo ''.$title.''; echo 'Posted on '.$date.''; echo ''.$description.''; } } ?> Conclusion : Select your category and click on go button and you will see the fetched news from rss feed. read rss using php script
- Jeetendra Singh
- 22 Dec, 2015
Steps to create dynamic multilevel menu using php and mysql
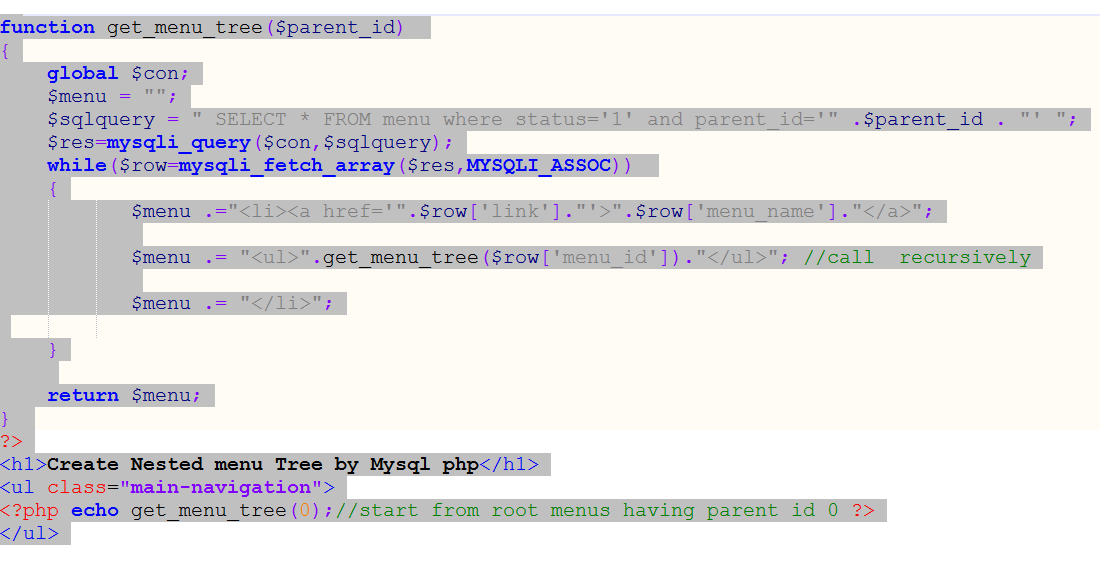
Hi Geeks, Today i am sharing you ” Steps to create dynamic multilevel menu using php and mysql” which can be called “example of recusion in php & mysql”. What Exactly recursion is ? Recursion is a technique or Algorithm by which we can go and return the collection of sequenced data with n depth. It is a condition based child search and return the output to the previous stepped varriable’s scope. we can solve many of the programming problems using recursion. In following Example we will sort out a problem where we need to show nested n number of depth relation saved in mysql menu table with having proper opening and closng the and tags in html. Following are the steps : Step 1. Create a mysql Table in your database by executing following sql statement -- -- Table structure for table menu CREATE TABLE IF NOT EXISTS menu ( menu_id int(11) NOT NULL AUTO_INCREMENT, menu_name varchar(255) NOT NULL, parent_id int(11) NOT NULL DEFAULT '0' COMMENT '0 if menu is root level or menuid if this is child on any menu', link varchar(255) NOT NULL, status enum('0','1') NOT NULL DEFAULT '1' COMMENT '0 for disabled menu or 1 for enabled menu', PRIMARY KEY (menu_id) ) ENGINE=InnoDB DEFAULT CHARSET=latin1 AUTO_INCREMENT=37 ; -- -- Dumping data for table menu INSERT INTO menu (menu_id, menu_name, parent_id, link, status) VALUES (1, 'Home', 0, '#home', '1'), (2, 'Web development', 0, '#web-dev', '1'), (3, 'WordPress Development', 0, '#wp-dev', '1'), (4, 'About w3school.info', 0, '#w3school-info', '1'), (5, 'AWS ADMIN', 2, '#', '1'), (6, 'PHP', 2, '#', '1'), (7, 'Javascript', 2, '#', '1'), (8, 'Elastic Ip', 5, '#electic-ip', '1'), (9, 'Load balacing', 5, '#load-balancing', '1'), (10, 'Cluster Indexes', 5, '#cluster-indexes', '1'), (11, 'Rds Db setup', 5, '#rds-db', '1'), (12, 'Framework Development', 6, '#', '1'), (13, 'Ecommerce Development', 6, '#', '1'), (14, 'Cms Development', 6, '#', '1'), (21, 'News & Media', 6, '#', '1'), (22, 'Codeigniter', 12, '#codeigniter', '1'), (23, 'Cake', 12, '#cake-dev', '1'), (24, 'Opencart', 13, '#opencart', '1'), (25, 'Magento', 13, '#magento', '1'), (26, 'Wordpress', 14, '#wordpress-dev', '1'), (27, 'Joomla', 14, '#joomla-dev', '1'), (28, 'Drupal', 14, '#drupal-dev', '1'), (29, 'Ajax', 7, '#ajax-dev', '1'), (30, 'Jquery', 7, '#jquery-dev', '1'), (31, 'Themes', 3, '#theme-dev', '1'), (32, 'Plugins', 3, '#plugin-dev', '1'), (33, 'Custom Post Types', 3, '#', '1'), (34, 'Options', 3, '#wp-options', '1'), (35, 'Testimonials', 33, '#testimonial-dev', '1'), (36, 'Portfolios', 33, '#portfolio-dev', '1'); Step 2. Connect with databaseStep 3. Implement the recursion logic ".$row['menu_name'].""; $menu .= "".get_menu_tree($row['menu_id']).""; //call recursively $menu .= ""; } return $menu; } ?>Step 4: Ininitialize start the Recursion in Parent Content HolderStep 5: Close the Mysql connectionStep 6. depth css implementation in style tag in head sectionul { list-style: none; padding: 0; margin: 0; background: #1bc2a2; }ul li { display: block; position: relative; float: left; background: #1bc2a2; }/* This hides the dropdowns */li ul { display: none; }ul li a { display: block; padding: 1em; text-decoration: none; white-space: nowrap; color: #fff; }ul li a:hover { background: #2c3e50; }/* Display the dropdown */li:hover > ul { display: block; position: absolute; }li:hover li { float: none; }li:hover a { background: #1bc2a2; }li:hover li a:hover { background: #2c3e50; }.main-navigation li ul li { border-top: 0; }/* Displays second level dropdowns to the right of the first level dropdown */ul ul ul { left: 100%; top: 0; }/* Simple clearfix */ul:before, ul:after { content: " "; /* 1 */ display: table; /* 2 */ }ul:after { clear: both; }Conclusion : Complete Code in one File.create dynamic multilevel menu using php and mysqlul { list-style: none; padding: 0; margin: 0; background: #1bc2a2; }ul li { display: block; position: relative; float: left; background: #1bc2a2; } /* This hides the dropdowns */ li ul { display: none; } ul li a { display: block; padding: 1em; text-decoration: none; white-space: nowrap; color: #fff; } ul li a:hover { background: #2c3e50; } /* Display the dropdown */ li:hover > ul { display: block; position: absolute; } li:hover li { float: none; } li:hover a { background: #1bc2a2; } li:hover li a:hover { background: #2c3e50; } .main-navigation li ul li { border-top: 0; } /* Displays second level dropdowns to the right of the first level dropdown */ ul ul ul { left: 100%; top: 0; } /* Simple clearfix */ ul:before, ul:after { content: " "; /* 1 / display: table; / 2 */ } ul:after { clear: both; }// Perform queries function get_menu_tree($parent_id) { global $con; $menu = ""; $sqlquery = " SELECT * FROM menu where status='1' and parent_id='" .$parent_id . "' "; $res=mysqli_query($con,$sqlquery); while($row=mysqli_fetch_array($res,MYSQLI_ASSOC)) { $menu .="<a href='".$row['link']."'>".$row['menu_name'].""; $menu .= "".get_menu_tree($row['menu_id']).""; //call recursively $menu .= ""; }return $menu;} ?> Create Nested menu Tree by Mysql php
- Jeetendra Singh
- 11 Dec, 2015
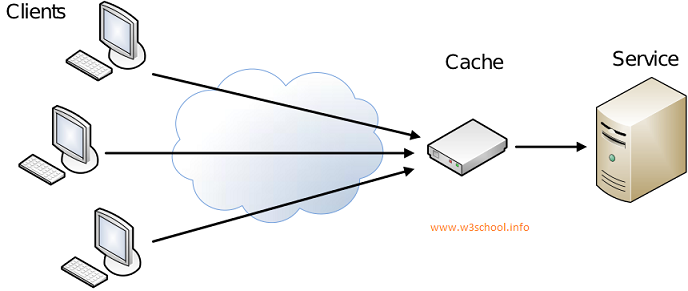
Implement caching in php website
Hi Experts, Today i am sharing you Step by Step instructions for Implement caching in php website. First of all we have to understand that what is cache exactly and how cache exactly works . What is cache ? Cache is a technique to optimize web page speed,load time and execution . it just reduces database calls and load by delivering contend by cached pages or objects which we saved in file-system or objects .We can Achieve cache with multiple logic like File Storage Cache(Most popular & this article is about itself),Object Stored cache( like Memcache),Application level cache (like Varnish Cache) ,SQL Query Cache. Simply Cache is not a logic or program it is just a concept and that can be achieve with multiple logic or programs/techniques as above. Now See that How Cache works with Server and Client See in Following Figure.Now Step by Step Implement caching in php website Step 1 : Create a Cache class with file name cache.class.php in your website root directory cache_ext=$cache_ext; $this->cache_time=$cache_time; $this->cache_folder=$cache_folder; $this->ignore_pages=$ignore_pages; $this->dynamic_url = "http://".$_SERVER['HTTP_HOST']. $_SERVER['REQUEST_URI'] . $_SERVER['QUERY_STRING']; $this->_cache_file = $this->cache_folder. md5($this->dynamic_url).$this->cache_ext; $this->_ignore_status = (in_array($this->dynamic_url,$this->ignore_pages))?true:false; if($cache_enable==1) { if (!$this->_ignore_status && file_exists($this->_cache_file) && time() - $this->cache_time _cache_file)) { //check Cache exist and it's not expired. ob_start('ob_gzhandler'); //Turn on output buffering, "ob_gzhandler" for the compressed page with gzip. readfile($this->_cache_file); //read Cache file echo '_cache_file)).', Page : '.$this->dynamic_url.' -->'; ob_end_flush(); //Flush and turn off output buffering exit(); //no need to proceed further, exit the flow. } } //Turn on output buffering with gzip compression. ob_start('ob_gzhandler'); }}?>Step 2 : Put Following code Before your website header file/template file or any file where you want to achieve cache. Note : this code should be always upper from your tag starts.Step 3 : In the Footer template or page just After the close tag. cache_folder)) { //create a new folder if we need to mkdir($cache_obj->cache_folder); } if(!$cache_obj->_ignore_status){ $fp = fopen($cache_obj->_cache_file, 'w'); //open file for writing fwrite($fp, ob_get_contents()); //write contents of the output buffer in Cache file fclose($fp); //Close file pointer } ob_end_flush(); //Flush and turn off output buffering?>Step 4 : Check you page and see that for the time you set in code or by default 1 hour you webpage will give same output for all users very quickly. Question : how to verify that cache is implemented or not Answer : load your webpage where you implement this cache system after it CTRL+U or see page source. in that in last of your code there will be a html comment having following text ” cached page by cache class by w3school ” Now Enjoy the Script by https://www.w3school.info/

- Jeetendra Singh
- 20 Oct, 2015
How to remove index.php from Codeigniter url
Here we will learn how to remove index.php from codeigniter url. Each of codeigniter constructed url contains the value index.php and excluding root url. No url cannot be run without index.php Assume a scenario , we have a website named www.myciportal.com Where we didn’t remove the index.php from url and i have a category with following details category name: techbuzz So by default it’s url will create like following default url : www.myciportal.com/index.php/techbuzz it will not run like this way www.myciportal.com/techbuzz For make this possible we have to work on config and htaccess both and steps are following to achieve this task If you are using mod_rewrite to remove the index.php in each url construct of codeigniter then you have to follow these steps: Step 1: In CI Project root Folder of your project create a .HTACCESS file and place following code in it RewriteEngine on RewriteBase /myprojectname RewriteRule ^(application|system|.svn) index.php/$1 [L] RewriteCond %{REQUEST_FILENAME} !-f RewriteCond %{REQUEST_FILENAME} !-d RewriteRule ^(.*)$ index.php/$1 [QSA,L] Comments :: In above code myprojectname is passed with RewriteBase , which is the demo project name of our ci project,if you are running on main domain then Redirect base will be / only , or if you are running your project in any directory then you have to specify that name. Now Step 2: in your project >> application/config/config.php Replace following line $config['index_page'] = 'index.php'; with $config['index_page'] = ''; //removed the index.php after htaccess done Now you can run your Codeigniter project and you can see the index.php has been removed from every Controller Action

- Jeetendra Singh
- 10 Oct, 2015
How to Make First PHP Program?
Hi Friends, Before writing first PHP Program, you will have to set the environment. And, for make this, you need to install the Xampp server in your system. After successful installation, we need a code editor, there are several code editors like Notepad++, Code Lobster, Netbeans etc. You can use any code editor as per your comfort for writing code. First off, go to the drive where you have installed the Xampp server. Click on Xampp and go to the htdocs folder. But don’t forget to start Xampp control panel and Apache, MySql services before writing the code. Now create a folder for your project with any name. Suppose we create a folder name myproject. Now inside this folder create a file name index.php. Below is the snippet for creating your first PHP program:Program for Print Hello W3schoolecho is a php function used for print/display on web browsers. Now Run in localhost by following address http://localhost/myproject/index.php This will print the output as follows Hello W3school Now we have done with “how to make first PHP program,” we will learn about the if – else statements, switch cases, array, data retrieval from database and many more, which are important to create a complete website.
- Jeetendra Singh
- 10 Oct, 2015
How to Install Xampp Server?
XAMPP is a free web server package developed by Apache Friends. It consists interpreters for code written in PHP programming language, and it has few other elements also which are as follows:**Apache:**It’s an application server which must be installed in machine to run a PHP program.**Mysql:**A database system for data storage in tables.**PHP:**A server side scripting language, widely used for dynamic website creation.Now follow the link to download and install Xampp server according to your operating systems whether it is Windows, Linux or Unix. Download Xampp from it’s Official Website click here After downloading the setup file you can access the url by http://localhost/ Create any program or Project you can see in this article
- Jeetendra Singh
- 08 Oct, 2015
PHP Tutorial for Beginners – An Introduction
PHP (PHP Hypertext Preprocessor) is a web development scripting language which is widely used for creating dynamic websites and portals. It Supports oops (object oriented programming standards). Top 5 frameworks which are very popular these days in web development are written in php, which are as follows:Laravel (Completely written in Symphony Objects)Symphony (Very Powerful Framework)CodeIgniterZend (acquired PHP itself)Cake PHPAll of these frameworks follow MVC (Model,View,Controller) architecture. It also has several cms also. We are providing a brief overview here: WordPress: It is basically built for blogging websites, but now you can make any informative web portals and using its woo-commerce extension, you can make e-commerce website also. Joomla: Web Portal development can be used for Ecommerce and News Portal and Great CMS. Drupal: Drupal is also most popular and advance level cms and can be used possibly for every type of web portals, including blog, magazine, newspaper, e-commerce. This can be used for any other complex cms also. Like these cms, few shopping cart solutions are also popular in this competitive market. They are listed below Magento: We can say it an e-commerce king as it is widely used for enterprise level e-commerce websites. Opencart: A very lightweight cart solution and it is ready to use for medium level e-commerce projects Prestashop: it is also very useful shopping cart solution, widely used in the United Kingdom for creating shopping websites and portals. So, my dear friends, you have experienced our first PHP TUTORIAL. We will keep you update with our further web development tutorial series also.